Before you can really immerge yourself into the development of robotic systems, you will probably need to install Linux on your computer. Why? Because the Robot Operating System ROS is running best on Ubuntu. Even though there is a Windows 10 version, I cannot really say much about it. Also, the version for Arch Linux is not really working for me. The best experience I ever had is on Ubuntu.
Of course you could also choose any derivative based on Ubuntu such as Kubuntu, Lubuntu, etc. I personally tried Pop!_OS, but I could not figure out how to boot into Windows afterwards.
Before installing Ubuntu, you need to prepare the installation media. Therefore, the most convenient way is to take an empty USB drive with at least 8GB of storage and burn an ISO image to the USB drive (see below). Alternatively, you could burn a CD with the installation image, but this would also require a blank CD and a CD burner. The USB drive has the advantage that you can format it later and reuse it for different purposes. (Or just keep the USB ready as a reparation tool in case you would need it.)
Downloading the ISO
First, go to Ubuntu.com and click on the Download tab where you choose Desktop and click on 18.04 LTS. LTS stands for Long Term Support and means that this version is supported for five years during which security updates are being released.

After clicking on the 18.04 LTS button, the download should start. Depending on your internet speed, this could take a while as the ISO file is nearly 2GB in size.

Installing Etcher
Next, we need a program that can write the ISO file onto the USB drive and make it bootable i.e. you can boot your computer through the USB drive. For this, you can use Etcher. It is available for Windows, Linux and Mac and it does a good job. The website already suggests your current operating system for the download. Click on the Download button to start the download.
An alternative would be Rufus which is for Windows only.

After the download has finished, execute the installer and accept the necessary license agreements and execution rights to install Etcher.

Flashing the USB drive
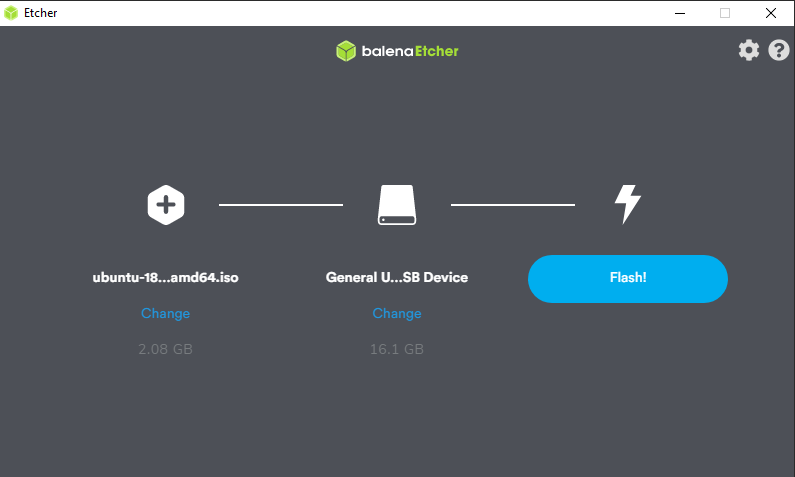
When the installation has finished, the program should open automatically providing its interface where you can choose an ISO image and a USB drive. Plug in the USB drive that you want to use as installation media. Select the Ubuntu ISO file that you just downloaded and select the USB drive. Make sure that you have selected the right USB drive, otherwise you could loose your data. The USB drive should be empty and formatted in FAT32 format. To format the USB drive as FAT32, you can select it in your file browser and right click on the USB drive icon. Choose the option format to format the USB drive.

When everything is ready, click on the Flash! button to start writing to the USB drive.

After the flashing process has finished, the software will validate the result. When this is finished, the USB drive can be removed from the computer.

Make some free space
The last step is to make some space on the hard drive for the Ubuntu installation. Therefore, open the start menu (press the Windows key) and search for Disk Management.

The Disk Manager shows the partitions that are currently mounted to the computer. Right-click the partition that you want to shrink and select resize to make space for the Ubuntu installation. If you have several hard drives in your computer, you can even distribute the installation on several hard drives (e.g. root directory on an SSD and home directory on an HDD).
If you have a large enough SSD drive, I recommend you to use the SSD to make an Ubuntu partition. If you Don’t mind to have a slower system, you can simply use your HDD drive instead. The root directory will be the directory containing all the files of your system including your installed programs and your user files. The home directory is a sub-directory withing the root directory and contains all the user files like Downloads, Documents, Music or Pictures.

After clicking on resize Volume, a window will pop up and ask for the size to shrink. I suggest that you make at least 30GB free space to make sure you have enough for the installation and the data you want to store. Though, the recommended minimum size is around 16GB. If you decide to have different partitions on different hard drives, you need to make free space according to your needs. (The root directory should have at least 16GB.)

After resizing the partition, there should now be an empty partition that says not allocated. It is important that the partition resizing is done inside Windows as this allows Windows to reallocate the data on the disk so that the free space is really not being used by the system.

Now, the preparations for installing Ubuntu as a Dualboot system are done. The next step is to set up the bootloader to boot into a USB drive and to boot into the Ubuntu drive for the installation.