Linux is an open source operating system similar to Windows or MacOS. It is often called GNU/Linux as Linux has many tools from the GNU project included. There is not just one version of Linux, there are many, usually called distributions, or distros for short. Those distros include Debian, Ubuntu, Fedora and Arch Linux. In principle, each version can do the same things, but some distros are easier to use for some tasks or are dedicated towards specific use cases.
Why using Linux?
The installation of the Robot Operating System (ROS), a useful framework for developing robotic systems, requires Linux on your computer. For the best experience (and the least headaches), I recommend installing Ubuntu 18.04 with ROS Melodic alongside Windows.
Note: You also could install Ubuntu 20.04 with ROS Neotic, but as it is still in an early stage, some functionality might still be missing.
Installation
Having those two operating systems installed allows you to still use Windows as you already did before with the possibility to use Ubuntu on the same computer. This reduces the amount of hardware necessary for doing the job while allowing you to use the full capacity of your computer. The process of installing two operating systems on one computer is called Dualbooting.
The following two articles will show you how you can prepare a USB drive for the installation and how you install Ubuntu on your computer.
This part will explain how to make the dualboot installation after the installation media has been prepared and some free space has been allocated on the hard drive.
There are many reasons why you may like to create a dualboot system. In the case of a robot developer, the main reason is that you will probably need a Windows operating system and a Linux operating system, in this case Windows 10 and Ubuntu 18.04. The Robot Operating System (ROS) that is widely used for developing software for robotic systems is works best on Ubuntu. Other software such as 3D CAD software is mainly available on Windows only, such as SolidWorks, Fusion 360, etc.
Changing the Boot Order
The first thing we need to do is to change the boot order of the computer so that it will not start the Windows partition first. Therefore you need to enter the BIOS (or UEFI) of your computer. Depending on your machine, this can be done by either pressing one of the following key at boot time: F1, F2, F11, F12, DEL or ESC. As you can see, there are many keys, but only one or two will work on your machine as every brand has a different key that needs to be pressed. An easier method to enter the BIOS is to go through the settings menu within Windows 10.
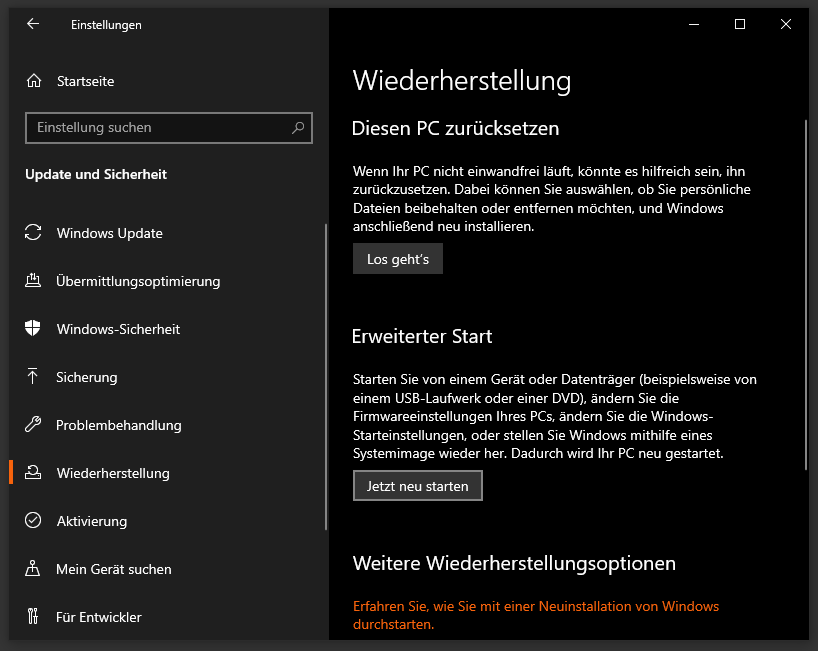
Go to Settings | Update&Security | Recovery and click on the Restart Now button under the Advanced Startup section. This will reboot the computer into the (who guessed it) Advanced Startup mode.
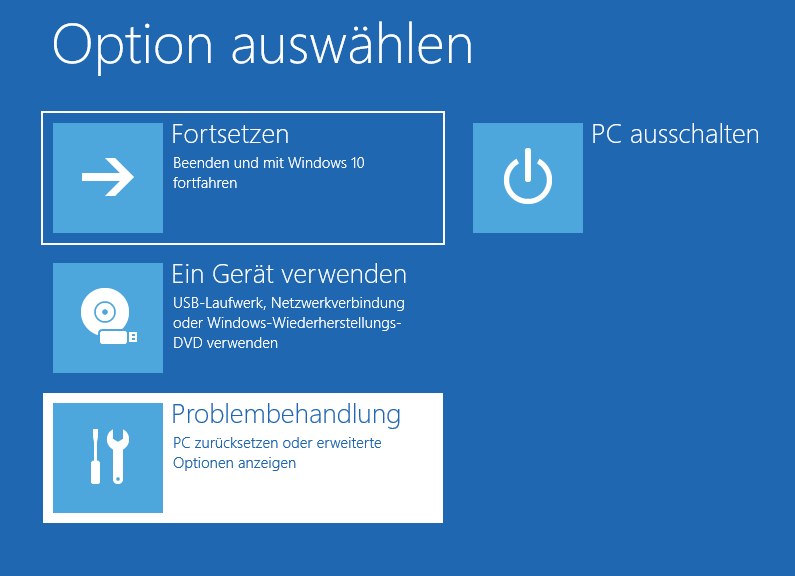
In the Advanced Startup mode, there are several options to choose from such as Continue or Choose Device. Choose here the Troubleshoot option to get to the next screen.
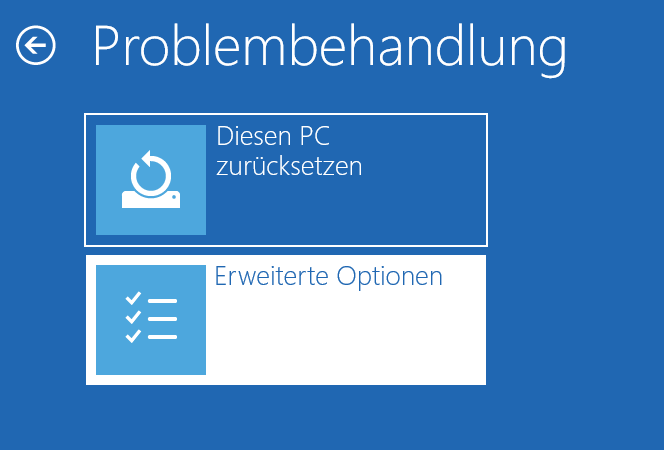
On the next screen, choose the Advanced Options button.
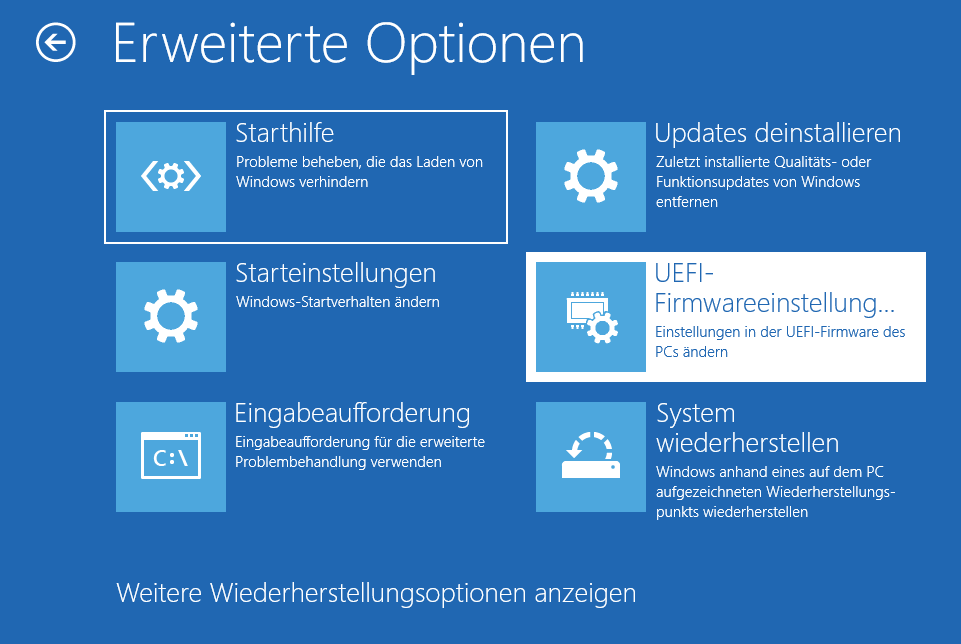
The screen that appears next has some more options. You should click on the UEFI Firmware Settings.
The system will restart. After this is done, you will see the BIOS or UEFI screen. It might look different to the one shown below.
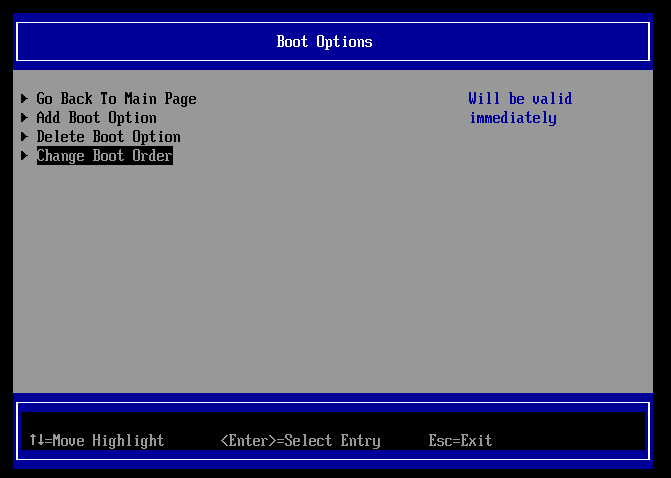
Here, you need to look for an entry that says something similar to Boot Options where you could find and select the Change Boot Order settings. Here, when pressing ENTER, a screen shows the possible boot options in a given order. Most probably there will be something like Windows 10 on top and some other entries like USB drive or CD drive. The USB drive option must be on top (the interface will tell you which key you need to press to rise or lower the entries). The Windows entry should be below the USB drive entry. Confirm the option and close the menu. Now you need to save the configuration and reboot by pressing the keys indicated on the screen.
Installing Ubuntu
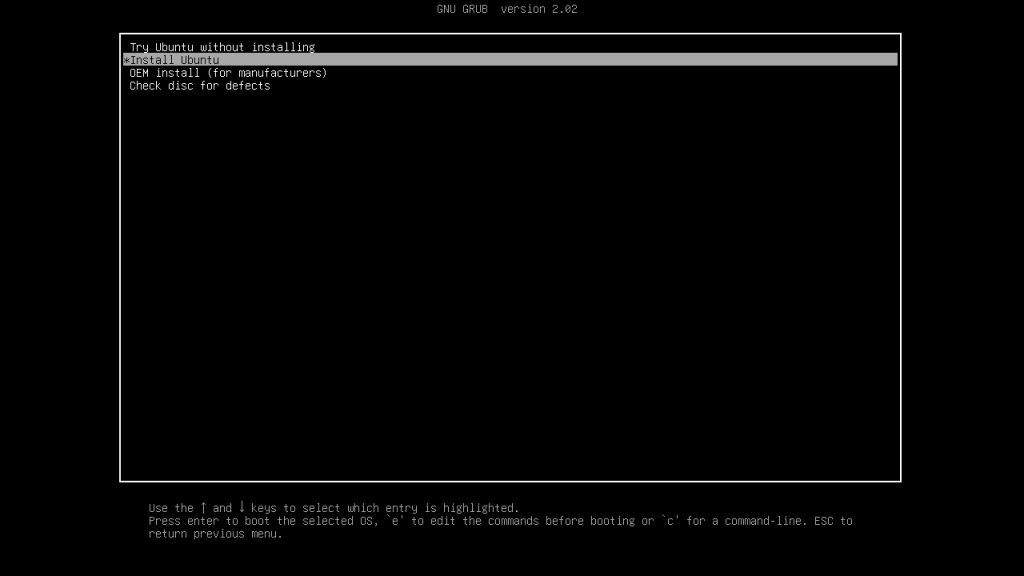
Before rebooting the system, you need to plug in the USB drive with the ISO image that you prepared before. By doing so, the computer can read the USB drive and boot from the USB drive instead of the local hard drive. The image below shows the GRUB bootloader from Ubuntu loaded from the USB drive. GRUB gives you several options.
The first option can be used to test the system with Ubuntu without installing it. It still provides the option to install it without rebooting the system. The second option is leading you directly to the installer. The third option, the OEM install (OEM = original equipment manufacturer) is also an installer which is especially made for when you do not intend to set up the user account and keyboard options yourself. This is not necessary unless you do not install the software for yourself. The last option is for system recovery. You should choose the first option which allows you to make sure the WiFi works fine and the graphics card is also working fine before you install Ubuntu.
Disable GPU Drivers
Depending on your system, you might have a dedicated GPU that needs additional drivers (mainly when you have Nvidia hardware). If this is the case, you’ll need to disable the preinstalled GPU drivers as they can cause problems during installation. You only need to do this if you encounter any problems like freezes during the installer AND if you have a dedicated GPU.
This section is especially interesting for all the robotics enthusiasts that are also PC gamers. If you have a MSI laptop with an Nvidia graphics card, you will probably encounter the issue of a freezing system during installation. The following instructions are from mari-linhares GitHub page on how to install GPU dirvers on MSI laptops.
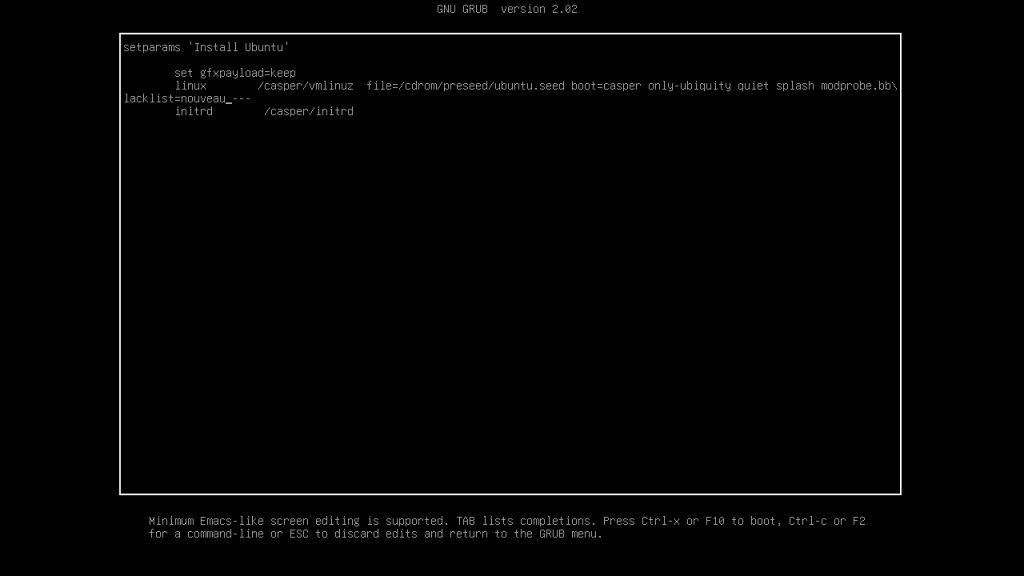
When you still have the GRUB selection screen in front of you, do not press ENTER but the key E to configure the boot option. The following screen should appear.
The text on the screen says the following:
setparams 'Install Ubuntu'

    set gfxpayload=keep
    linux   /caspervmlinuz file=/cdrom/preseed/ubuntu.seed boot=casper only-ubiquity quiet splash ---
    initrd  /casper/initrd
Insert the following at the end of the line starting with “linux” right after the “quiet splash”:
modprobe.blacklist=nouveau
This line will now disable the Nouveau hybrid graphics driver. This means that the computer will boot and render all graphics on the CPU. After the installation you will be able to install the necessary Nvidia driver. Therefore, when the installation has finished, you will need to redo this step again. Now press CTRL+X to start the installer and install Ubuntu.
Ubuntu Installation
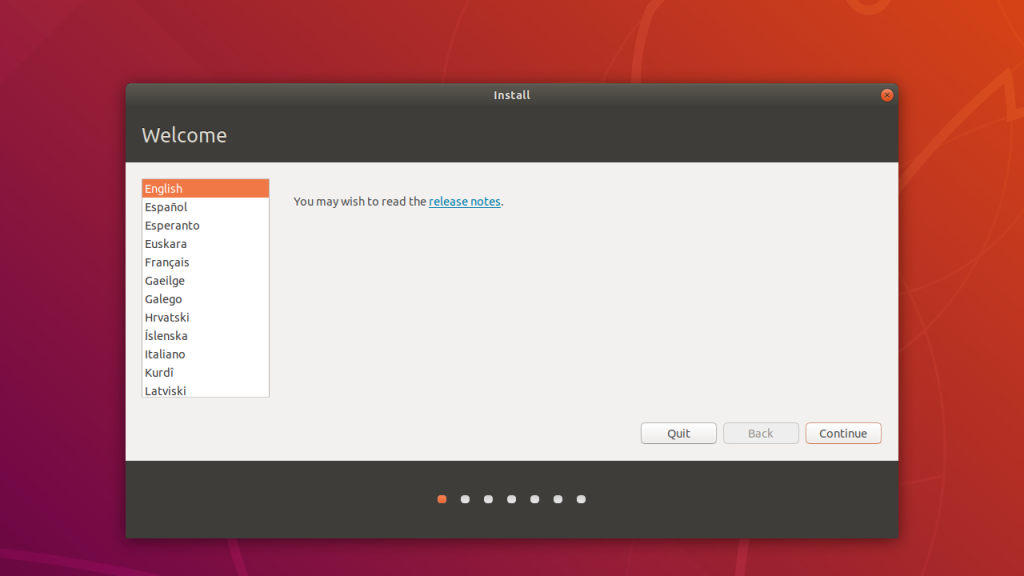
The installer first asks which language you want the system to be.
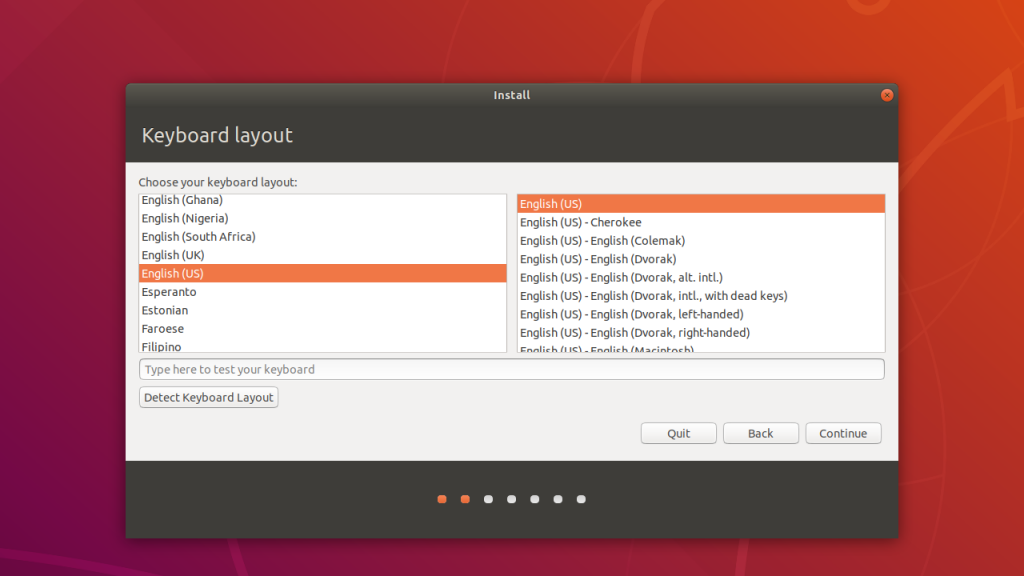
The next step is to choose a keyboard layout. The keyboard layout can be changed later in the Settings menu after the installation is finished.
Now, a screen will ask you to select a wireless network. Here you need to choose the network of your choice and enter the password of the network to establish a connection. In my case, this step is omitted as I use a wired connection.
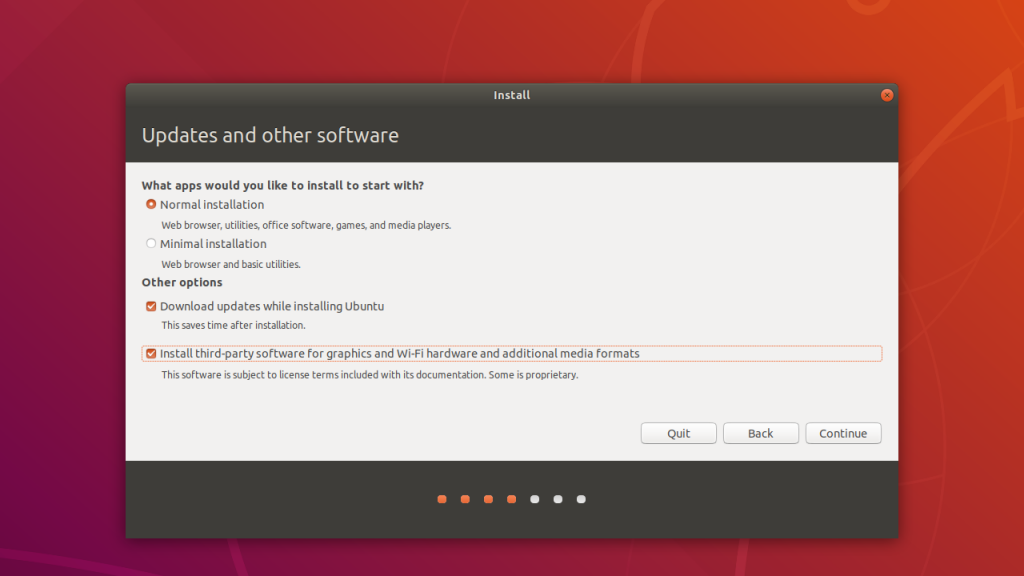
Next, you are able to choose whether to take a Normal Installation or a Minimal Installation. Here you can stick to the Normal Installation as you can always remove unnecessary software. You also want to install updates during installation and you should install the third-party software. This is necessary for the wireless card and graphics card to work properly as most of those parts use proprietary drivers.
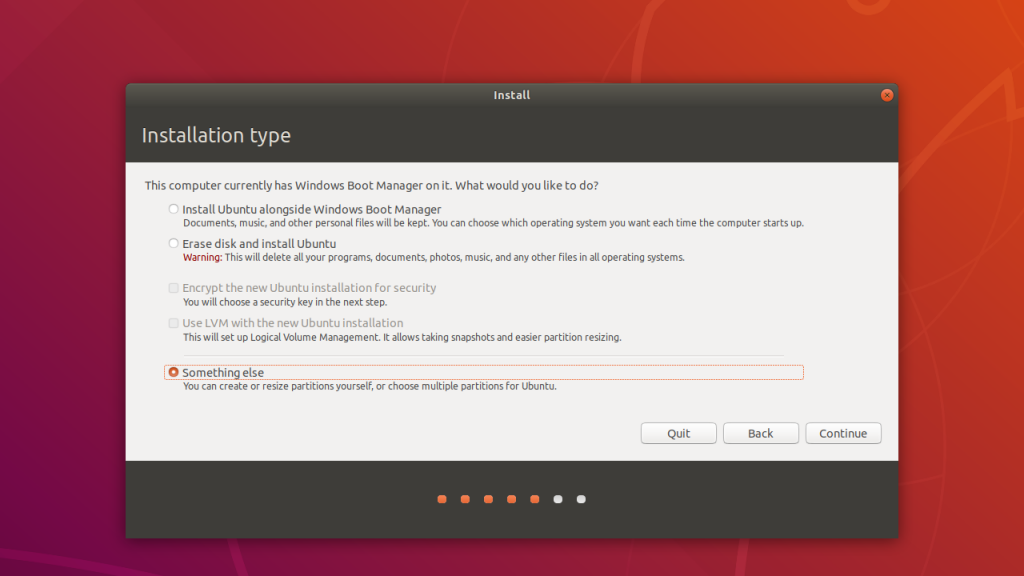
The installation type will be depending on your needs. If you want to remove Windows 10, you could use the Erase disk and install Ubuntu option. Most likely, you don’t want that. The idea is to make a dualboot installation. You could probably choose the first option to Inststall Ubuntu alongside Windows Boot Manager but some people recommend not to choose this option. You will probably prefer to do the partitioning manually, therefore choose Something else.
Hard Drive Partitioning
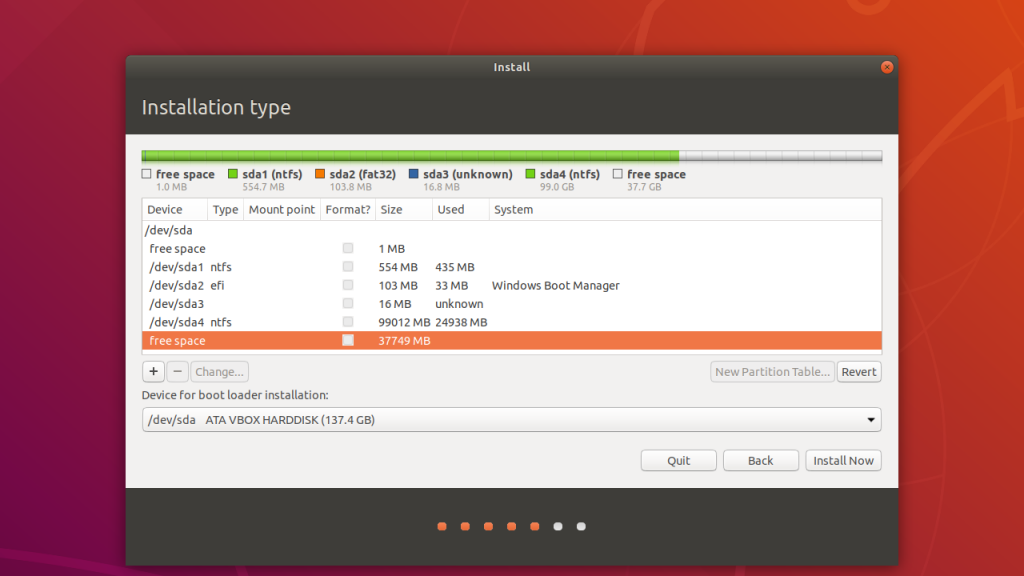
The following screen will show the partitions on your hard drive, including the free disk space that you prepared before. The idea is to divide this free disk space into smaller partitions with the following functions: SWAP, BOOT and ROOT. The Swap partition is used when your RAM (Random Access Memory) is insufficient to manage the current workload. It serves as spare memory. The boot partition will serve as the boot loader and is necessary to boot the Ubuntu partition. The root partition is the actual partition containing Ubuntu. Click on the plus sign to make a new partition.
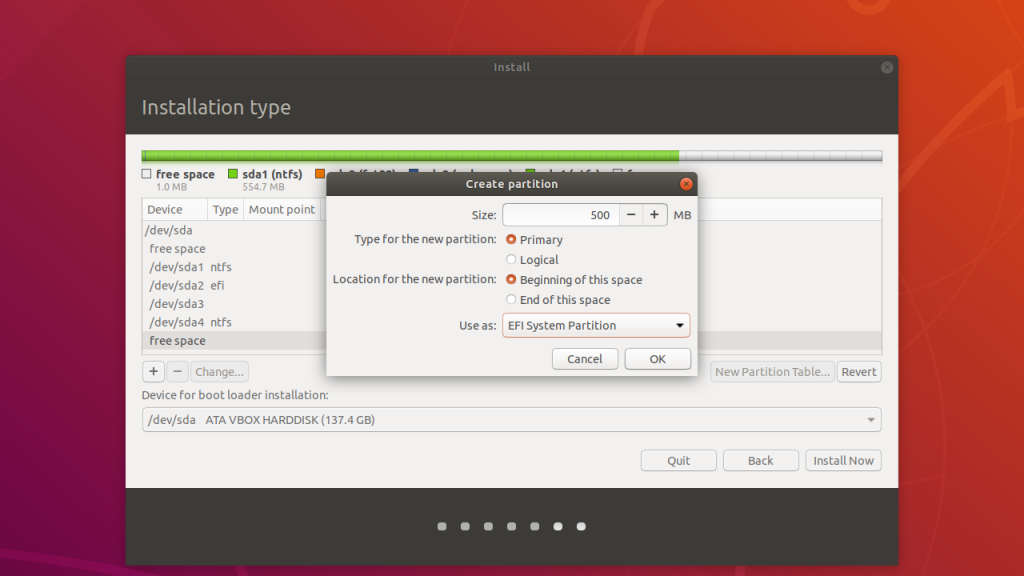
The first partition you want to make is the boot partition. This is used to make the operating start up when booting. The size can be 500 MB and you’ll choose EFI System Partition in the drop-down list. When this is done, click OK.
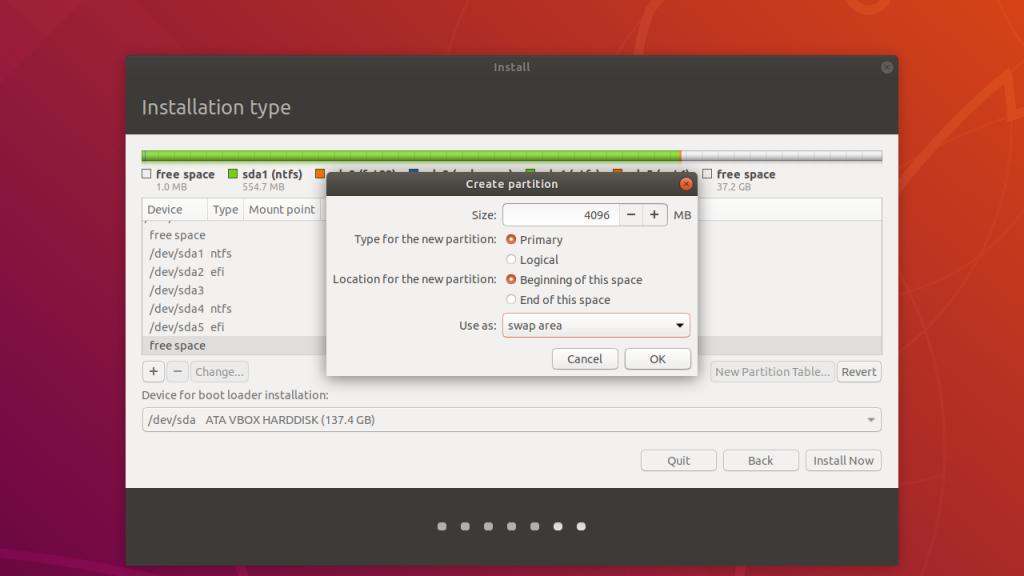
The next partition is the Swap partition. This partition is used as an extension of your RAM. It is often recommended that you use a little more than the amount of your actual RAM, but you can even do with less (like in my case) or don’t use Swap at all when your RAM is sufficient enough (i.e. more than 6 GB for example, depending on your case).
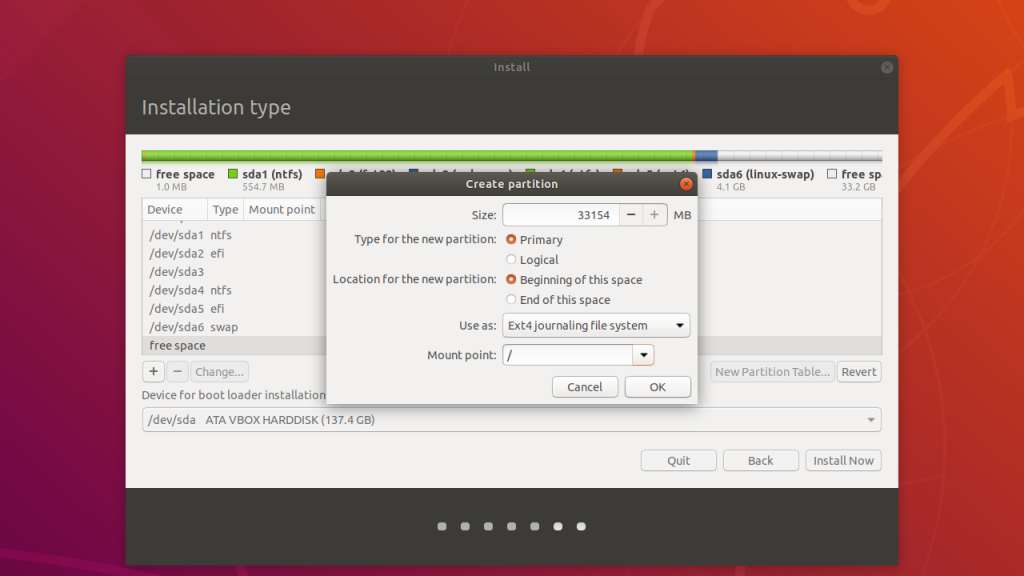
The next step will configure the root partition of your system. The root folder (indicated with “/”) is the directory at the very top of the file system, every other directory is contained inside the root directory.
There are several possibilities to use the rest of your free disk space: you can either allocate the rest of the remaining disk space to the root folder (as shown below) or you can save some space and create a “/home” partition which contains all your personal files. If you do not create a separate “/home” partition, it will automatically be created inside the “/” partition.
The advantage of having a separate “/home” partition is mainly that you can keep your personal files safe in case the system would be corrupted or you want to install a new system with the same personal files. Another big advantage is that you can even make the “/home” partition on a second hard disk. So if you have two hard drives, one SSD and one HDD, the most convenient way would be to take a small bit of the SSD for the “/” partition and a bigger partition on the HDD for the /home” directory.
For the sake of simplicity, I use the remaining free space as my root partition. The Mount Point is “/” from the drop-down menu and the partition will be formatted in Ext4 journaling file system.
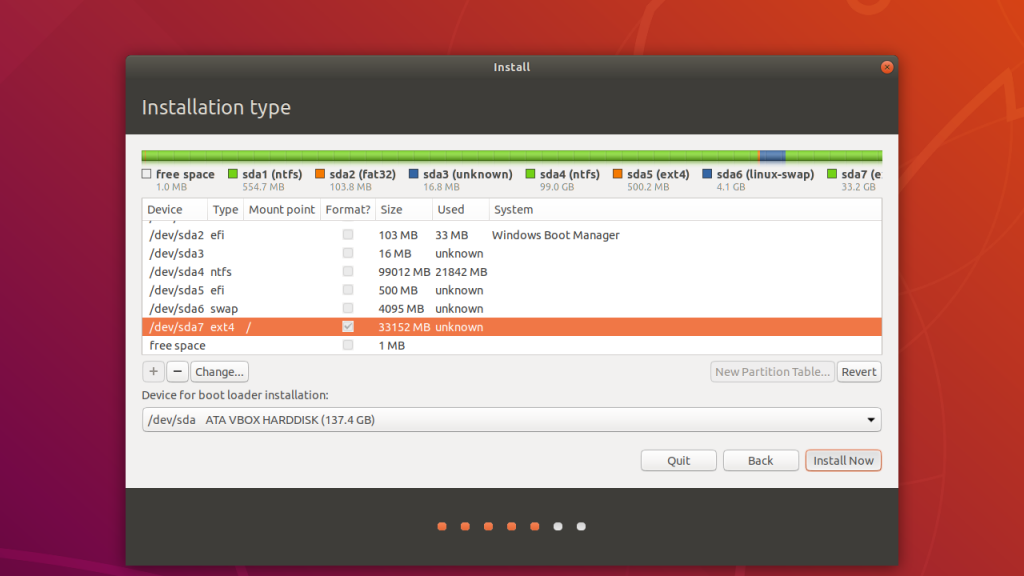
Now, you should have all the partitions. Choose at the bottom where the boot loader should be installed, in this case it is the same drive as the previously created EFI partition. Click Install Now at the bottom to continue. A message will show you what steps will be done for the partitioning. Here you need to click OK.
Finishing the Installation
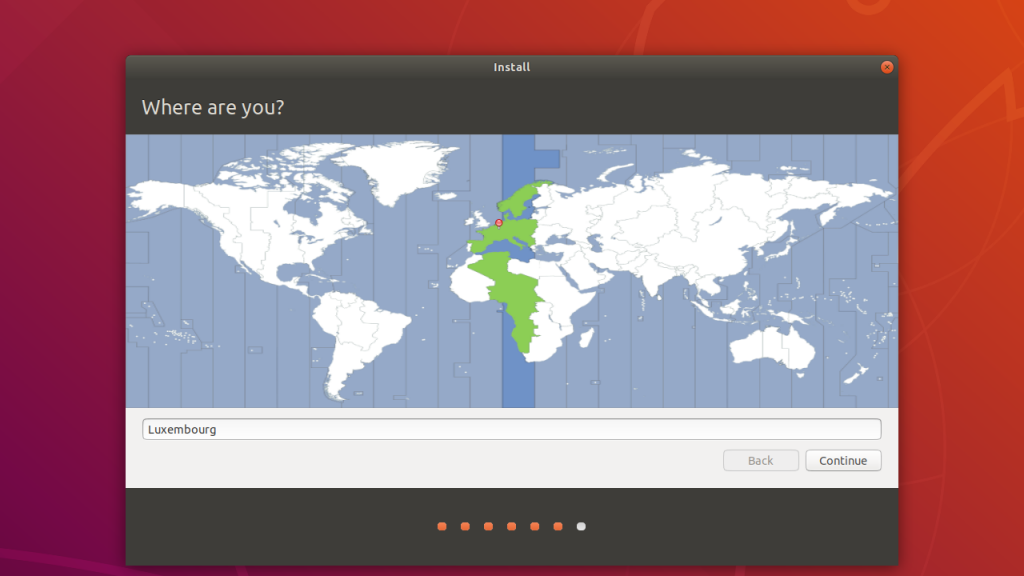
The next-to-last step is to choose your location. Based on the information from the internet, the system might suggest a location, if not you can search for it in the search bar or click on the map. The location will also change the default settings on how the time and date will be displayed.
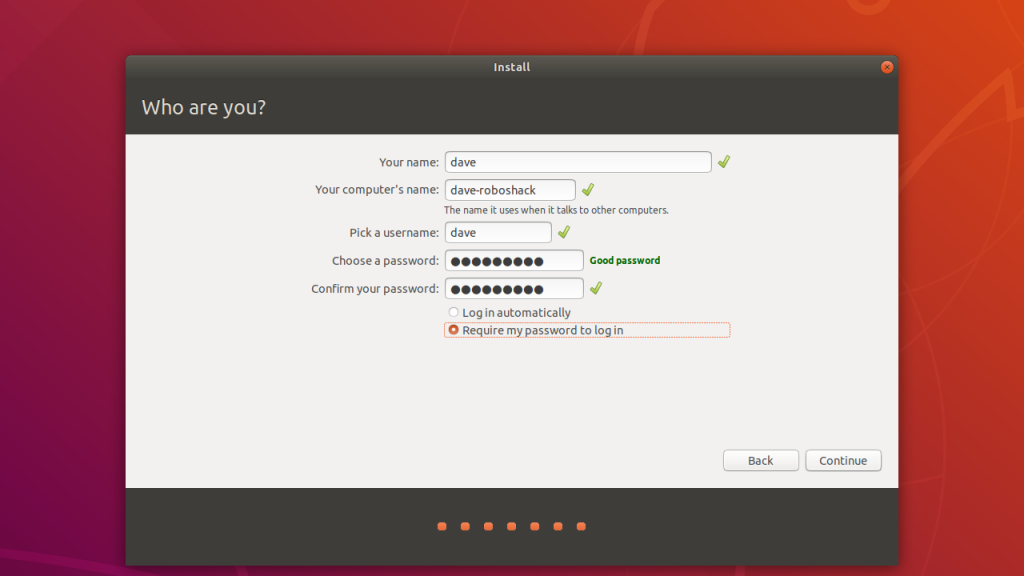
The last step is to enter your name, the computer name, the username and the password. The system will ask you for your full name (and auto fill the remaining fields). Your name will not be used for anything important and no third party entity will have access to that information. The computer’s name will be the name with which the computer will be identified by the network and by your internet browser for example. Your username will be shown in the terminal, the login screen etc. and you might need to type it in a few times when you log in to your system. The password will be used to login to your computer and to grant administrator rights to software. The password should be strong, but you should be able to remember it. You will need it quite often when installing software, run several programs, etc., so you don’t want to wonder every time what your password was.
After clicking Continue, the installation process will continue until it is finished. Depending on the computer, the process should take around 20 minutes.
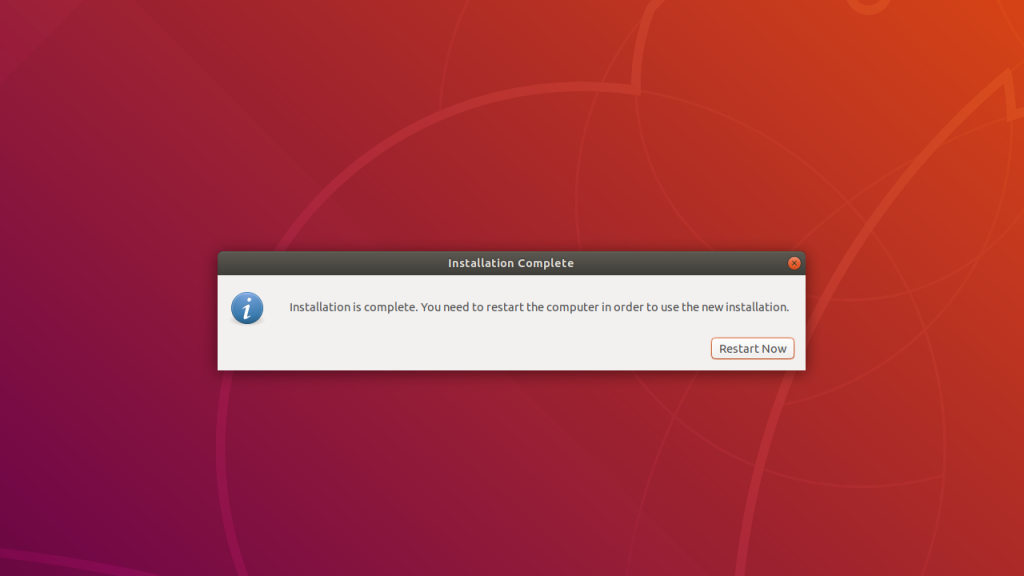
When the installation process is finished, a dialog box will appear and ask you to restart the system.
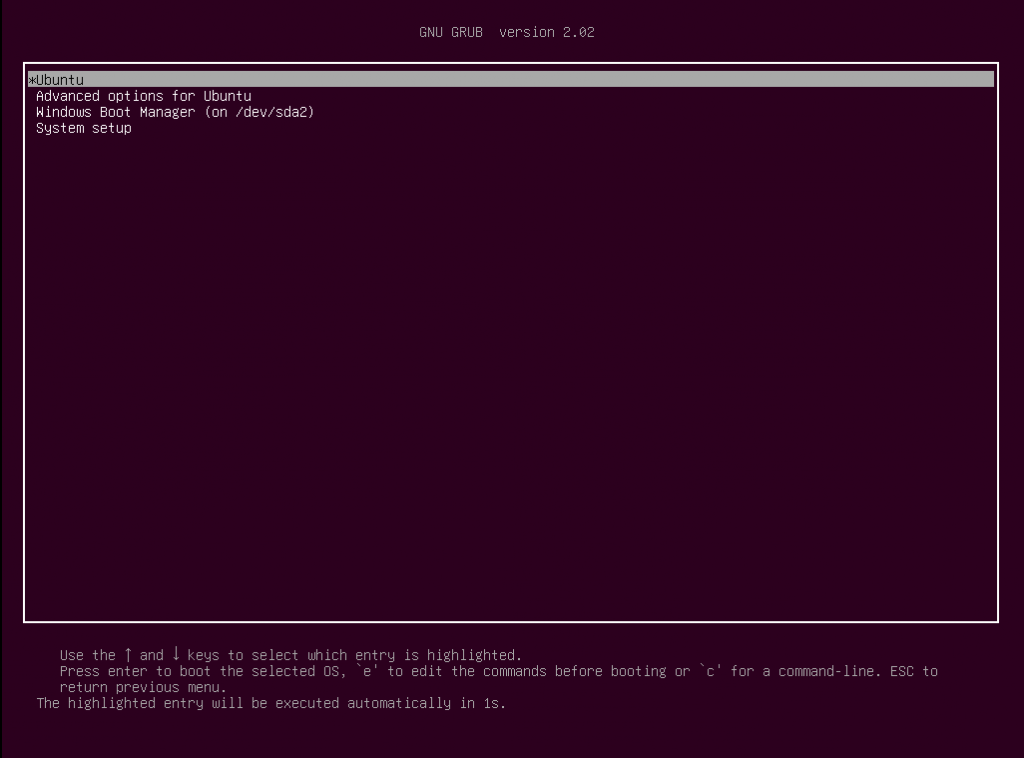
After restarting the system, you can remove the USB drive and the following screen should be visible. This is the GRUB bootloader of your installed system. It gives you the possibility to either choose Ubuntu, Windows, System Setup or the possibility to open Advanced Options for Ubuntu. You will probably need the latter only when the system is not working anymore. To boot Ubuntu, choose the first entry and to boot Windows, choose the third entry. Watch out, the GRUB bootloader only gives you 10 seconds to interact and will otherwise boot the first entry automatically.
The installation of your dualboot system is now finished.
Installing GPU Drivers
If you needed to disable the GPU drivers before installing Ubuntu, you probably still need to install the proper GPU drivers for the graphic card. To do that, you will need to disable the GPU drivers as described earlier. From the GRUB bootloader, you select the Ubuntu option and press E. The screen will have a similar entry as previously and again you need to add the parameter modprobe.blacklist=nouveau and press CTRL+X to start the system.
Next, you need to open a terminal by either pressing CTRL+ALT+T or by pressing the Windows key (also called super key) and typing “Terminal”. Then, the following commands need to be typed in or copy pasted (to paste in the Terminal, you need to press CRTL+SHIFT+V) to the terminal. Again, the following instructions are from mari-linhares GitHub page on how to install GPU dirvers on MSI laptops.
First add the repository of the Nvidia drivers to your system:
sudo add-apt-repository ppa:graphics-drivers/ppa
Update the system to read the new repository:
sudo apt update
Now install the driver. You can install the driver version that corresponds to your system:
sudo apt install nvidia-driver-396
Now you can restart the system and you should not need to disable the GPU drivers ever again before restarting:
sudo reboot
Now, the installation is completed and there is nothing to do but installing software to get started with programming.
Before you can really immerge yourself into the development of robotic systems, you will probably need to install Linux on your computer. Why? Because the Robot Operating SystemROS is running best on Ubuntu. Even though there is a Windows 10 version, I cannot really say much about it. Also, the version for Arch Linux is not really working for me. The best experience I ever had is on Ubuntu.
Of course you could also choose any derivative based on Ubuntu such as Kubuntu, Lubuntu, etc. I personally tried Pop!_OS, but I could not figure out how to boot into Windows afterwards.
Before installing Ubuntu, you need to prepare the installation media. Therefore, the most convenient way is to take an empty USB drive with at least 8GB of storage and burn an ISO image to the USB drive (see below). Alternatively, you could burn a CD with the installation image, but this would also require a blank CD and a CD burner. The USB drive has the advantage that you can format it later and reuse it for different purposes. (Or just keep the USB ready as a reparation tool in case you would need it.)
Downloading the ISO
First, go to Ubuntu.com and click on the Download tab where you choose Desktop and click on 18.04 LTS. LTS stands for Long Term Support and means that this version is supported for five years during which security updates are being released.
After clicking on the 18.04 LTS button, the download should start. Depending on your internet speed, this could take a while as the ISO file is nearly 2GB in size.
Installing Etcher
Next, we need a program that can write the ISO file onto the USB drive and make it bootable i.e. you can boot your computer through the USB drive. For this, you can use Etcher. It is available for Windows, Linux and Mac and it does a good job. The website already suggests your current operating system for the download. Click on the Download button to start the download.
An alternative would be Rufus which is for Windows only.
After the download has finished, execute the installer and accept the necessary license agreements and execution rights to install Etcher.
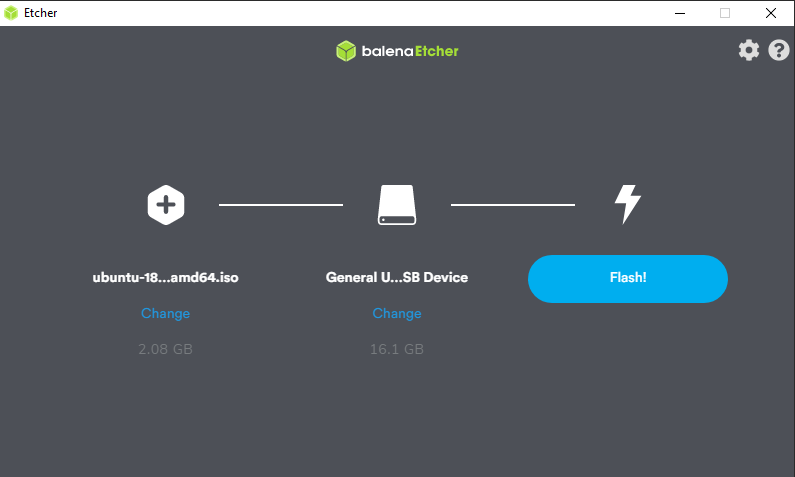
Flashing the USB drive
When the installation has finished, the program should open automatically providing its interface where you can choose an ISO image and a USB drive. Plug in the USB drive that you want to use as installation media. Select the Ubuntu ISO file that you just downloaded and select the USB drive. Make sure that you have selected the right USB drive, otherwise you could loose your data. The USB drive should be empty and formatted in FAT32 format. To format the USB drive as FAT32, you can select it in your file browser and right click on the USB drive icon. Choose the option format to format the USB drive.
When everything is ready, click on the Flash! button to start writing to the USB drive.
After the flashing process has finished, the software will validate the result. When this is finished, the USB drive can be removed from the computer.
Make some free space
The last step is to make some space on the hard drive for the Ubuntu installation. Therefore, open the start menu (press the Windows key) and search for Disk Management.
The Disk Manager shows the partitions that are currently mounted to the computer. Right-click the partition that you want to shrink and select resize to make space for the Ubuntu installation. If you have several hard drives in your computer, you can even distribute the installation on several hard drives (e.g. root directory on an SSD and home directory on an HDD).
If you have a large enough SSD drive, I recommend you to use the SSD to make an Ubuntu partition. If you Don’t mind to have a slower system, you can simply use your HDD drive instead. The root directory will be the directory containing all the files of your system including your installed programs and your user files. The home directory is a sub-directory withing the root directory and contains all the user files like Downloads, Documents, Music or Pictures.
After clicking on resize Volume, a window will pop up and ask for the size to shrink. I suggest that you make at least 30GB free space to make sure you have enough for the installation and the data you want to store. Though, the recommended minimum size is around 16GB. If you decide to have different partitions on different hard drives, you need to make free space according to your needs. (The root directory should have at least 16GB.)
After resizing the partition, there should now be an empty partition that says not allocated. It is important that the partition resizing is done inside Windows as this allows Windows to reallocate the data on the disk so that the free space is really not being used by the system.
Now, the preparations for installing Ubuntu as a Dualboot system are done. The next step is to set up the bootloader to boot into a USB drive and to boot into the Ubuntu drive for the installation.