Okay, so you know what a topic in ROS is and when you can use it, but you still want to know HOW you can use it? Read here on how to make your own ROS programs in Python to subscribe to and publish to topics!
Tag: subscriber
Using Topics
You learned how to use ROS packages to start one or several nodes. You also learned how to create your own ROS programs with Python. In this article, you will learn how to subscribe to a Topic and how to publish to a Topic.
There are many sources covering ROS Topics such as the official ROS wiki (here and here) or other websites like Robotics Back End that you can use for further understanding.
What are Topics?
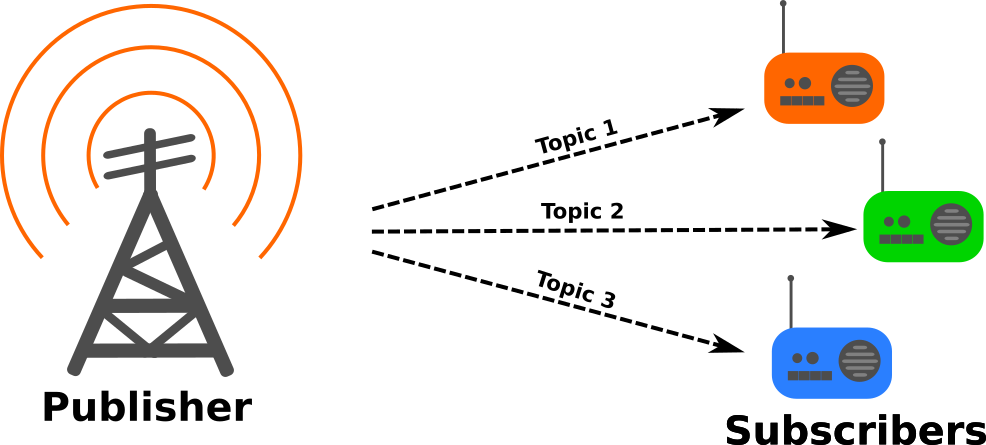
As already mentioned earlier, a Topic is a way of communication between ROS nodes. This protocol created a data stream from a Publisher to a Subscriber. It is possible that several Publishers are sending data to a Topic at the same time and several Subscribers can listen to a Topic simultaneously.
Each Topic consists of a Topic name and a message type. The name is used to refer to a specific Topic while the message type defines the actual structure of the content. A fairly common Topic name is /cmd_vel which contains a Twist message. Twist messages describe the three velocity parameters for the translation and rotation of a robot. Twist belongs to a category of ROS messages called geometry_msgs. This is simply the ROS package that contains these message definitions. Twist is defined as follows:
Vector3  linear:
    float64 x
    float64 y
    float64 z
Vector3  angular:
    float64 x
    float64 y
    float64 z
Note: You can find more references to the geometry_msgs Twist messages here and here.
This means that you can access the properties of a Twist object in the following way in Python:
my_message = Twist()

my_message.linear.x = 0
my_message.linear.y = 0
my_message.linear.z = 0
my_message.angular.x = 0
my_message.angular.y = 0
my_message.angular.z = 0
First, you define the name of the variable and set it to the variable type of Twist() which is a constructor that creates a Twist object. It initializes all the values to zero.
Topics can also be less complex data types such as Int or String which then only contain a simple integer or string value. These message types belong to the ROS package called std_msgs. Another very common type is sensor_msgs for IMU data, camera data or laser scanner data.
Using Topics in Terminal
In case you only want to see the content of a topic or see what topics are available, you don’t need to write a ROS program to listen to a Topic. You can do this in the terminal as well. You can even publish some data into a Topic. This is mainly used for testing purposes and not really used for actual robot control.
Starting TurtleSim
Before you get started, open a new terminal and start a roscore with the following command:
roscoreThen, open another terminal and start the turtlesim node with the following command:
rosrun turtlesim turtlesim_nodeThe first thing you need to know is, how to find which Topics are already used by a robot. This is useful as you can use the Topics that are already available rather then creating a new Topic even though, it is not necessary.
Finding Information about the Topics
The following command (again in a new terminal) will show you a list of the Topics that are either being published or subscribed to by a node:
rostopic listThe output in your terminal should look like this:
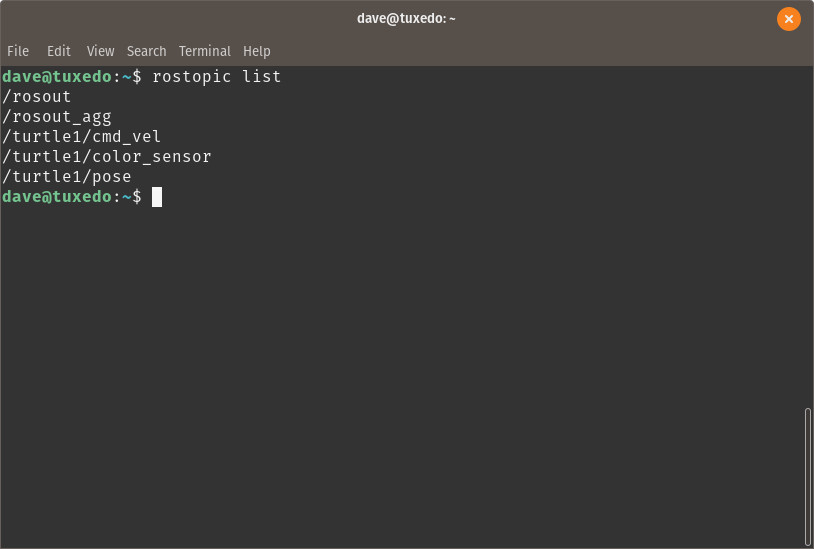
Now, you know which topics are currently available. You can get more information about these Topics with the following command:
rostopic info /turtle1/poseThis command will provide the following information:
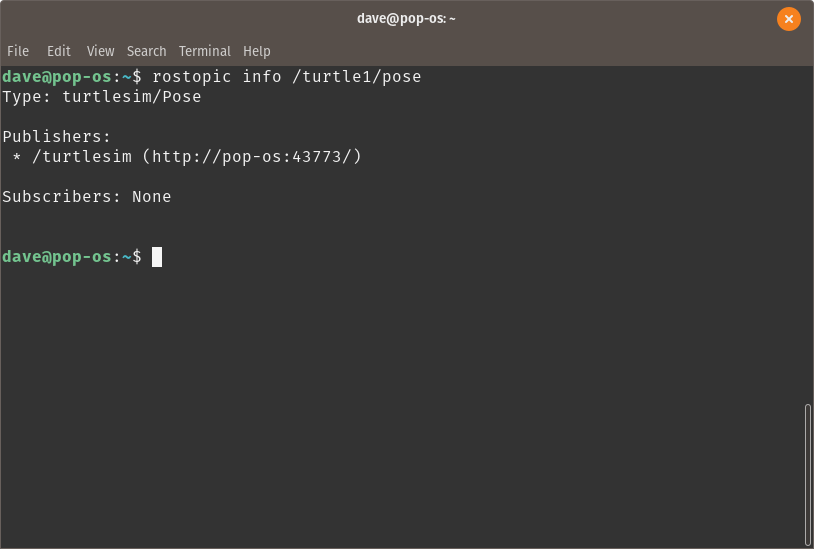
The information you get is that this topic is of type turtlesim/Pose which means it is a message type inside the package called turtlesim. The message type is Pose and it contains the following information:
float32 x
float32 y
float32 theta

float32 linear_velocity
float32 angular_velocity
The Pose messages contain information about the current position and orientation of the turtle and the linear and angular velocity. This block of information is published by the turtlesim regularly.
Subscriber
So the first thing you want to learn is how to see what is inside a Topic. Let’s take /turtle1/pose for example. You can listen to this Topic by using your terminal with the following command:
rostopic echo /turtle1/poseNow, you will see something like the following:

You can stop the incoming messages by hitting CRTL+c on your keyboard. The Topic that you are looking at is showing you the position of the little turtle on the canvas.
Publisher
Just like you can listen to a Topic through the terminal, you can also write messages to a Topic through the terminal. Therefore, you can use the following command to write to /turtle1/cmd_vel:
rostopic pub /turtle1/cmd_vel geometry_msgs/Twist "linear:
  x: 0.0
  y: 0.0
  z: 0.0
angular:
  x: 0.0
  y: 0.0
  z: 0.5"
Instead of typing the entire command, you can simple start typing the first part of the command and then autocomplete with the TAB key:
rostopic pub /turtle1/cmd_vel [TAB][TAB]Your terminal will look like this:
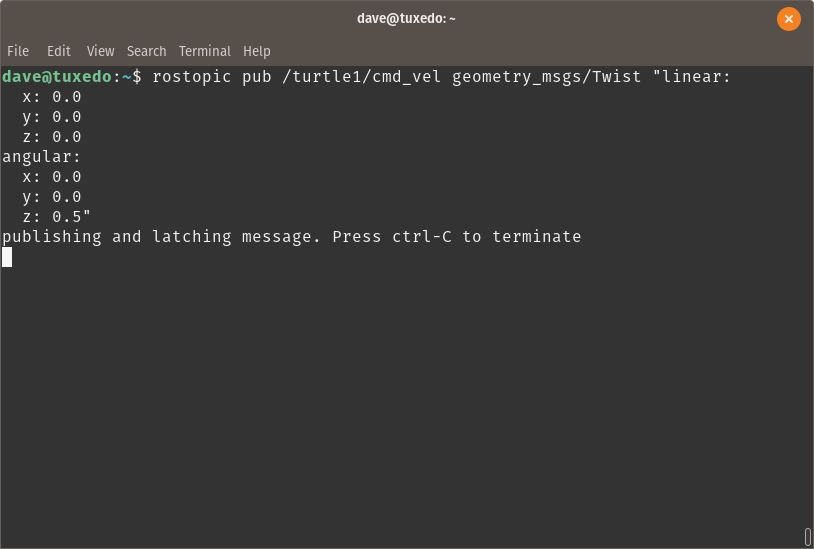
And your turtle will rotate on the canvas by 0.5 radians. The terminal will only send your message once and not continuously.

Using the terminal is mainly used for quick verification or testing of a system or for a single event that doesn’t need repetition. For controlling a robot, you will probably write a program that will perform the same tasks autonomously.
Using Topics in Python
When using Python to access Topics, you can have two different kinds of programs: a Subscriber or a Publisher. In addition, you can also have a program that implements several Subscribers or several Publishers or even both.
Subscriber
When making a robotic system, you are more likely to create a ROS node that will take the role of a Subscriber. This has the advantage that you can automatically listen to a Topic and then act depending on the data your program receives.
To start, you can go to the package you already made earlier:
cd ~/catkin_ws/src/my_turtlesim/scriptsNow you can create a new file called simple_subscriber.py in which you will write the Python code to create a Subscriber node:
gedit simple_subscriber.pyNow, an empty text editor window will pop up where you can type down the following code:
#!/usr/bin/env python

import rospy
from geometry_msgs.msg import Twist

def callback(data):
    print(data)
    print("------------------------------")

if __name__=="__main__":
    rospy.init_node("my_subscriber_node")
    my_subscriber = rospy.Subscriber("/turtle1/cmd_vel", Twist, callback)
    rospy.spin()
Save the code and then make the file executable with the following command:
chmod +x ~/catkin_ws/src/my_turtlesim/scripts/simple_subscriber.pyWhat this code does, is first importing the rospy library containing the necessary tools to create a ROS node and the Subscriber. Then, you also import the Twist message type that is contained in the ROS package called geometry_msgs in the subfolder msgs.
#!/usr/bin/env python

import rospy
from geometry_msgs.msg import Twist
The next part will create a function that will be called every time a new message from the Topic is arriving. As you do not call the method by yourself, but it is triggered through the incoming message, this function is often called a callback function. Note: the word callback is not a keyword. so you can give it any name you want. A common practice is to add the word callback inside the function name.
The content of the function is simply printing the received information and then it prints a line to separate the individual messages.
def callback(data):
    print(data)
    print("------------------------------")
Finally, the main program is checking if it is the main program or if this Python script is being imported as a module by another script. Then, it initiates a ROS node. After this, the script creates a Subscriber object that listens to the topic “/turtle1/cmd_vel” which is a message of type Twist and then when receiving a message, it will call the callback function with the incoming message as an argument. Finally, the rospy.spin() function will make sure that ROS doesn’t terminate this script but keeps it active until the user manually stops the script.
if __name__=="__main__":
    rospy.init_node("my_subscriber_node")
    my_subscriber = rospy.Subscriber("/turtle1/cmd_vel", Twist, callback)
    rospy.spin()
You can start the script with the following terminal command:
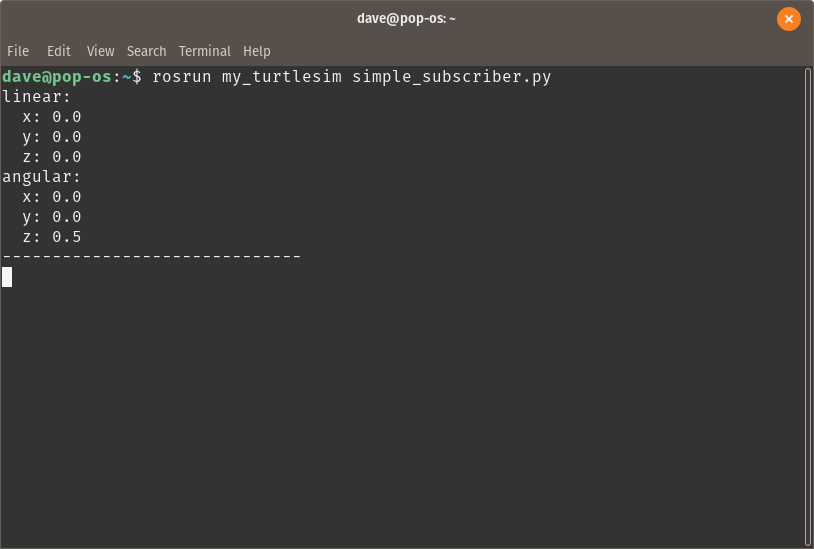
rosrun my_turtlesim simple_subscriber.pyAt first, you will not see anything as the node is not yet receiving any information. This is the case because there is no node publishing to the topic /turtle1/cmd_vel at this moment. You can change this by publishing a message yourself to this topic:
rostopic pub /turtle1/cmd_vel geometry_msgs/Twist "linear:
  x: 0.0
  y: 0.0
  z: 0.0
angular:
  x: 0.0
  y: 0.0
  z: 0.5"
After you start publishing messages to the topic /turtle1/cmd_vel, your simple_subscriber.py will show the following:
The next step is to make a publisher node in Python that will publish Twist messages for you.
Publisher
To start, you can go to the package you already made earlier:
cd ~/catkin_ws/src/my_turtlesim/scriptsNow you can create a new file called simple_publisher.py in which you will write the Python code to create a Publisher node:
gedit simple_publisher.pyAdd the following code to the file:
#!/usr/bin/env python

import rospy
from geometry_msgs.msg import Twist

if __name__=="__main__":
    rospy.init_node("my_publisher_node")
    my_publisher = rospy.Publisher("/turtle1/cmd_vel", Twist, queue_size=10)
    rate = rospy.Rate(10)
    my_velocity = Twist()
    my_velocity.linear.x = 0.5
    my_velocity.angular.z = 0.5

    while not rospy.is_shutdown():
        my_publisher.publish(my_velocity)
        rate.sleep()
Just like the Subscriber node, you start with importing the rospy module and the Twist message as we will use this message to publish to the topic “/turtle1/cmd_vel”.
#!/usr/bin/env python

import rospy
from geometry_msgs.msg import Twist
Inside the main program, you need to initialize a ROS node, in this case with the name “my_publisher_node”. This allows ROS to identify from which node, the topic is published.
After this, you create a publisher object with the following input parameters: topic name, message type and queue size. The topic name must have the exact same name as the topic that you want to use for communicating with other nodes. The message type indicates which variable type needs to be given to the publisher. The queue size is the length of the buffer containing the messages that still need ot be published. If the node is running too slow, the messages can pile up and the overflowing messages are ignored. With a queue size of 10, this buffer will containt up to 10 old messages until it drops newer messages. If the buffer is small, the messages are always more up-to-date while a big queue size will make sure that fewer messages are lost. Small queues are usually used for messages that require a fast reaction from other nodes while big queues are used for logging or high accuracy tasks.
if __name__=="__main__":
    rospy.init_node("my_publisher_node")
    my_publisher = rospy.Publisher("/turtle1/cmd_vel", Twist, queue_size=10)
The rate defines the frequency in Hz of the node. High frequencies result in quicker reaction times but also higher computational load and more data traffic. For many cases, a rate of 10 Hz is sufficient to keep the robot running. In a few cases, where real time behavior is wanted, 100 Hz is often used, but not much higher.
Then , with the Twist() constructor, you can create a template of your message. After initializing the message object, you can modify the variable, in this case my_velocity, to meet your wanted behavior. The code below will introduce a linear velocity in x direction which is the front of the robot and an angular velocity around the z axis which is pointing upwards.
    rate = rospy.Rate(10)
    my_velocity = Twist()
    my_velocity.linear.x = 0.5
    my_velocity.angular.z = 0.5
Finally, you need a loop that will keep your ROS program running until you stop it. Otherwise, the robot would only make a small step forwards and then stop. With this loop, it will keep driving forward and turn so that it will create little circles.
The condition “rospy.is_shutdown” will be false until you press CTRL+c on your keyboard to stop the program. Until then, this while loop will keep running. Inside the loop, the my_velocity message is sent to the topic /turtle1/cmd_vel. In this scenario, the message will not be updated. In a real robot, you would also read sensor data inside this loop and change the behavior of the robot with conditional statements.
The rate.sleep() function will make sure that the loop will not go to the next iteration until a certain time has passed. This time is defined by the frequency that you specified earlier. This is necessary in each Publisher as it would otherwise run through the loop as fast as it could and overflow the topic with data. If you would use a simple function to wait for 100 ms, the speed of your loop could change depending on how log the CPU needs to process the algorithms inside the loop. As this would be unreliable and inconsistent, the sleep function is the go-to method. If the algorithm inside the loop take longer, the loop will not wait at all, and when the algorithm takes less time, it will wait until the timer to maintain the specified frequency has been reached.
    while not rospy.is_shutdown():
        my_publisher.publish(my_velocity)
        rate.sleep()
You can start your publisher node with the following command:
rosrun my_turtlesim simple_publisher.pyYou will notice that the terminal does not show anything, but the turtle will start to move in a circle.
You can also verify the published messages with the following command:
rostopic echo /turtle1/cmd_vel -n 2This command will show you the messages send to the topic /turtle1/cmd_vel, which are the Twist messages that your simple_publisher.py program is publishing. The command above will show the following:
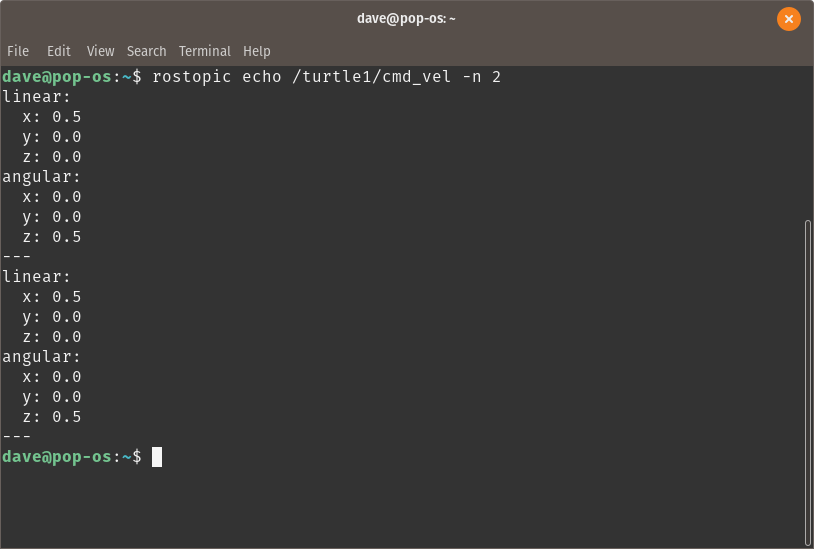
Note that the echo command usually keeps printing the new messages but with the parameter -n 2 it only prints two messages.
That’s it. Now you are able to write nodes that can subscribe or publish to topics. In some cases, you need to combine both in a single program. For now, you can continue with Services and how to set up a Service Server and how to create a Service Client.