You want to create your own ROS package? Have a look at the Creating ROS Packages guide and learn more about packages and launch files.
Category: Robot Operating System
Creating ROS Packages
After you learned how to use a ROS package, you will learn how to create your own ROS package.
Create a Package
Creating a package is done by using the catkin environment as each ROS package is following the catkin format. First, you need to go to your catkin workspace which is called catkin_ws. Open a terminal and type:
cd ~/catkin_wsNext, you need to enter the src directory which stores the source code of your own packages:
cd srcYou can create a new ROS package with the following command:
catkin_create_pkg <package_name> <dependencie_1> <dependencie_2> <dependencie_3> <...>Here, the <package_name> is the name of your package. Note that you can not simply change that name after you created it as you will need to modify the CMakeLists.txt file and the package.xml file. The <depenencies> are entries in the CMakeLists.txt and package.xml files that allow ROS to include some libraries that you can use. For Python programs, you need to add the dependency rospy and for C++ programs, you need to add roscpp. If you use libraries for navigation, sensor data collection or something else, you can also add these dependencies here.
For you package, you will simply add the rospy dependency and you can call the package my_turtlesim.
catkin_create_pkg my_turtlesim rospyIt is a convention to name packages with lower case names combined with an underscore. This notation is also called snake case.
Now, a new directory has been created containing a CMakeLists.txt file and the package.xml file and a folder called src. This folder is meant to contain the C++ source code. This is why many people and tutorials make a new directory for Python scripts called scripts. Therefore, type the following in your terminal:
cd ~/catkin_ws/src/my_turtlesim/
mkdir scripts
If you also have a robot model, configuration files or documentation to your package, you can create more folders and store the files in the correct folder.
Create a ROS Python Program
Now, you can create your first ROS program with Python. Enter the scripts directory with your terminal:
cd scriptsYou need to create a new file with the file extension .py in order to have a Python file. You can create a new file and open it with your terminal with the following command:
gedit my_first_program.pyYou will see that a new window will open on your screen with an empty text file. This is where you will write your first ROS program in Python.
Write the following code in your file and save the file:
#!/usr/bin/env python

import rospy

if __name__ == "__main__":
    rospy.init_node("my_first_node")
    rospy.loginfo("Hello World!")
Note: in order to use the ROS tools inside a Python script, you need to import rospy. Also, as every ROS program is running as a node, you need to declare a name for your node with the rospy.init_node(“my_first_node”) function. Each ROS node needs to have a name as otherwise the roscore doesn’t know which node is executing code. This means, one of the first things you want to do in your programs is to declare the name of the node.
Before you can run your program, you need to make the Python file executable, this means to give this file permissions from your system to be executed as a program. Usually, files only have the permission to be read as a file or to be modified. This is also known as read-write permission. To add the permission to execute the file, make sure you are in the scripts directory and type the following command in your terminal and press ENTER:
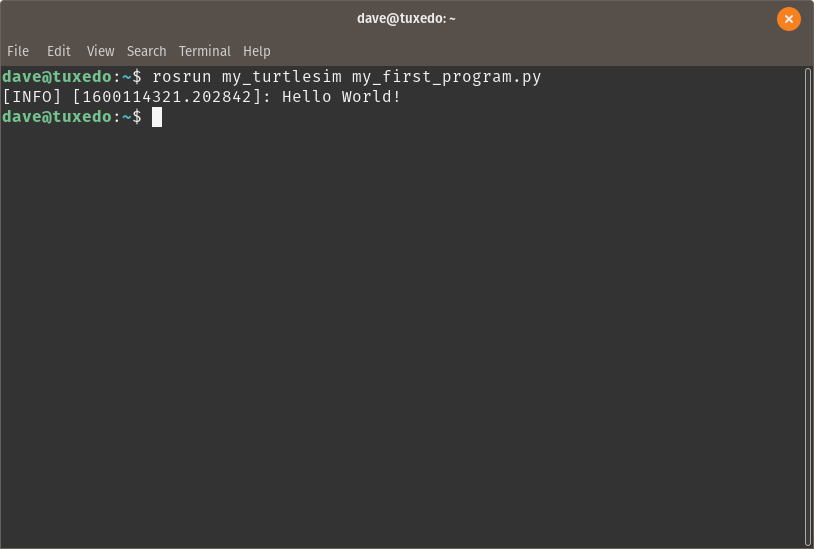
chmod +x my_first_program.pyMaking Python files executable is required for each Python file you create but you only need to do this process once for each Python file. You can run your Python program with the following command:
rosrun my_turtlesim my_first_program.pyThe terminal in which you started the Python program should output some text as you can see below:
Tip: you don’t need to type the entire command by yourself. If you start typing a word, you can double tap the TAB key on your keyboard to auto-complete the commands in your terminal.
Note: if your computer doesn’t show your ROS package, first make sure you actually have spelled the names correctly and that the package actually exists. Also, if the package is new, ROS might not know about it yet. Therefore, type the following to list all the packages on your system, after that, ROS should be able to auto-complete the name of your package as well:
rospack listThe above command will list all the installed ROS packages on your computer. As ROS is going through the entire system, it will probably find your package and add it to its known packages.
Create a launch file
You have already seen how to start a ROS program by using the rosrun command. The rosrun command allows you to start one single program at a time. In most cases, one single program will not be enough to get your robot up and running. In these cases, a launch file will make your life easier.
First, create a directory called launch to organize your package. Therefore, you must be inside your my_turtlesim folder.
cd ~/catkin_ws/src/my_turtlesim/
mkdir launch
Even though, there is no requirement to call this directory launch, it is a widely used convention. The best idea is, to stick to these conventions as they make life easier for you and your team.
Now, enter the new directory to create a new file. You can do this with your file browser or with the terminal:
cd launchYou can create a new file and open it with your terminal with the following command:
gedit turtlesim.launchNow, a new window should open up. It shows an empty text file. The launch extension is actually a XML file type that is used to create and structure a launch file for ROS.
Type the following code into the launch file and save the file:
<?xml version="1.0" encoding="UTF-8"?>

<launch>

    <node
        name="my_node"
        pkg="my_turtlesim"
        type="my_first_program"
        output="screen"/>

</launch>
Note: unlike Python programs, you do not need to make the launch file executable.
You can simply start it with the following command in a new terminal:
roslaunch my_turtlesim turtlesim.launchThe above command will give you the following result:
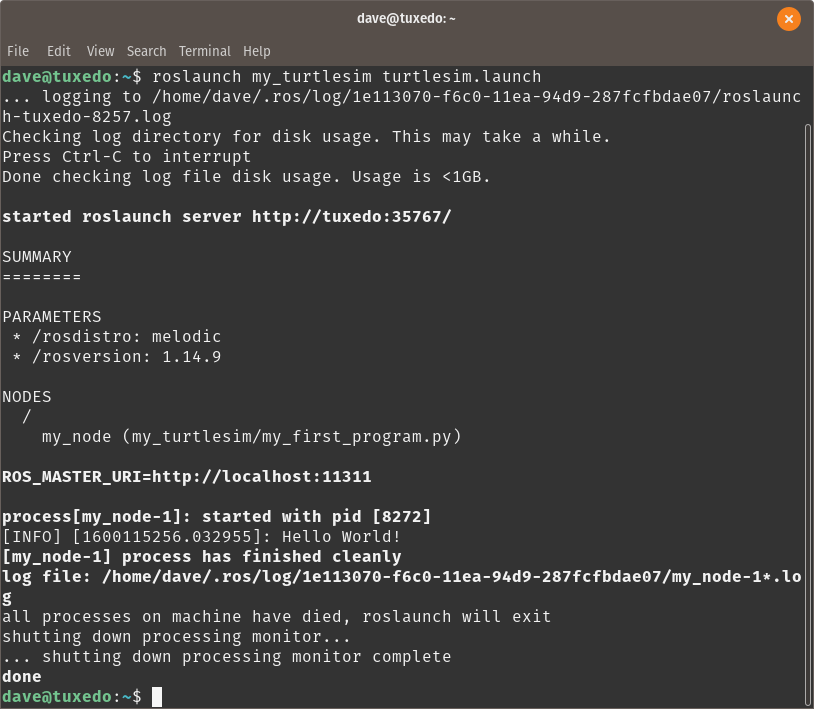
You can see that the roslaunch method of starting a program outputs much more in the terminal. This is because there is much more going on. At first, ROS will check if there is already a roscore running and if not, it will start the roscore. Next, it will start the programs that are listed in the launch file.
As you added the line output=”screen” to the launch file, it will print the output on the terminal, otherwise it would not show anything from the started programs.
You can now change the content of the launch file into the following code:
<?xml version="1.0" encoding="UTF-8"?>

<launch>

    <node
        name="turtlesim_node"
        pkg="turtlesim"
        type="turtlesim_node"
        output="screen"/>

    <node
        name="draw_square"
        pkg="turtlesim"
        type="draw_square"
        output="screen"/>

</launch>
Save the file and launch it again with:
roslaunch my_turtlesim turtlesim.launchYou should now see that the turtlesim window is opening and the turtle is immediately starting to move in a square pattern. The launch file has now started two ROS programs at the same time. This makes many things much easier. On top of that, you do not need to first start the roscore as the launch file is already starting it for you.
Explanation of the Launch File
The launch file is written in XML syntax. This means you have tags that are indicating the type of content. The following tag tells your computer what type of file the launch file actually is:
<?xml version="1.0" encoding="UTF-8"?>
The content of your launch file will then be written inside the launch tags:
<launch>

</launch>
Lastly, the node tags describe what ROS program you want to run. This is indicated with the following lines:
    <node
        name="turtlesim_node"
        pkg="turtlesim"
        type="turtlesim_node"
        output="screen"/>
Here, the syntax is as follows:
    <node
        name="<name_of_the_node>"
        pkg="<name_of_the_package>"
        type="name_of_the_program_file"
        output="screen"/>
In this context, the <name_of_the_node> refers to the name you used inside the rospy.init_node() statement. As you do not know the exact name of the turtlesim_node source file, you can just assume it has the same name as the program name. The <name_of_the_package> is the name of the ROS package that contains the wanted ROS program. The <name_of_the_program_file> is the name of the Python file with the .py extension or the name of the compiled C++ program which doesn’t have any extension in Linux.
The output=”screen” will make sure that all text will still be shown on the terminal. On a robot, you do not need this but for running programs on your computer with a screen, this is helpful to see what is happening. In case you create a launch file and you don’t see output in your terminal, check if this is missing.
With this, you have learned how to run and how to create ROS packages. Next, you will learn how to subscribe and publish to Topics.
Using ROS Packages
You want to get started using ROS packages? Read the guide on how to use ROS packages.
Using ROS Packages
The following article will explain what a ROS package is and how you can use them to run programs in ROS, the Robot Operating System.
What are ROS Packages?
As mentioned earlier, every program in ROS is delivered as a package. A package can contain various types of files where the most important files are the CMakeLists.txt file and the package.xml file. These two files are automatically generated when you create a package. These files contain information about the package so it can be build, which means the source code can be compiled so that you can run the programs. This means, that packages usually also contain the source code of the programs you want to run.
Now that you have an idea what a package is, you can see how you can run them.
Running a ROS package
Before running a ROS program, you need to do a couple of extra steps in advance. These steps are to build the catkin workspace, start the roscore and then starting the actual program.
The catkin workspace
A catkin workspace is a directory on your computer that follows some specific guidelines. These make it easier for the software using the directory and its files to find what it needs, in this case, the source code of your software.
To build your catkin workspace which you have created during the installation of ROS, you type the following two commands, assuming you called your catkin workspace also catkin_ws:
cd ~/catkin_ws
catkin_make
After catkin has finished, you can now start a roscore and then run the software.
Starting ROS
Before you can run any ROS program, you need to start a roscore. This can be done by opening a terminal and typing the following text and then hitting ENTER on the keyboard:
roscoreStarting the roscore in the terminal should output something similar to the following image:
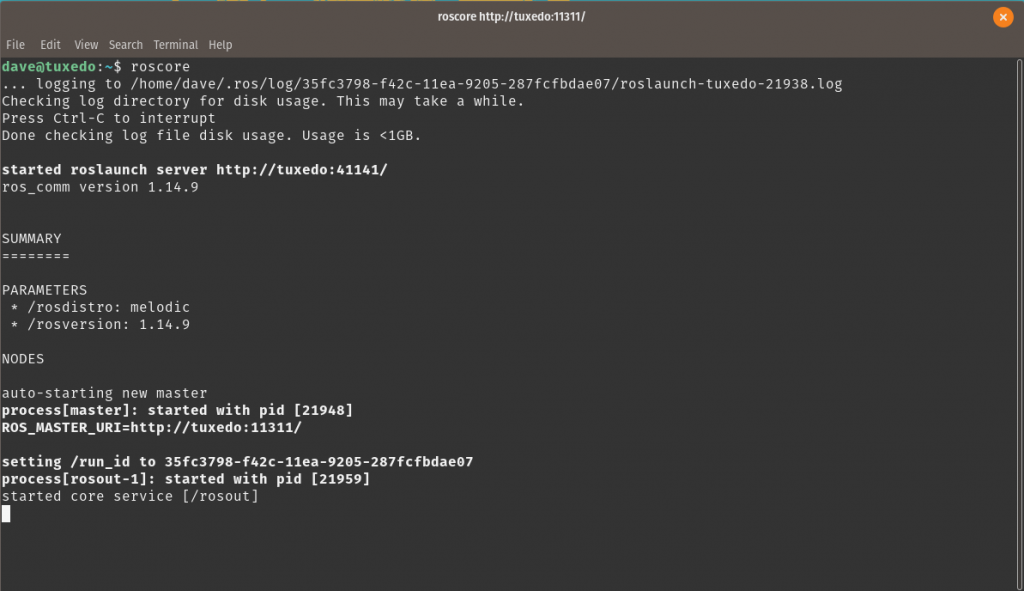
Now, the roscore should be running and the computer is ready to run ROS programs. Note: only one single roscore can run in the same robotic system at the same time, so you only need to do this step once.
If the roscore dies, you need to restart it. You can also stop the roscore by pressing CTRL+c on your keyboard.
Running a ROS program
Now, it is time to start a real ROS program. Therefore, you need to open a new terminal and then you can run a program with the following syntax:
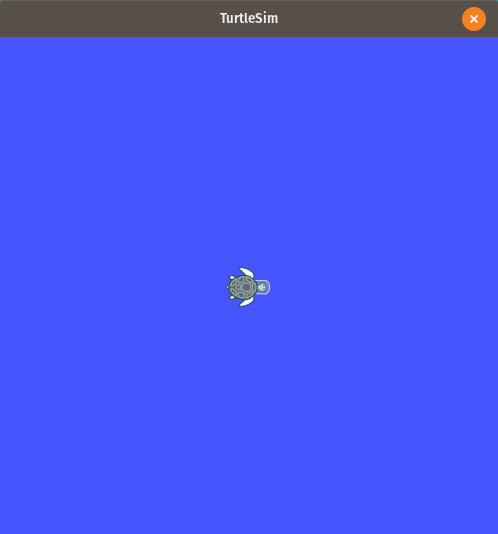
rosrun <ros_package> <ros_program>Of course, the <ros_package> and the <ros_program> are placeholders and need to be replaced by an actual package and program name. For example, you can run the turtlesim program which is an animated 2D turtle that can be controlled with ROS commands just like a real robot.
rosrun turtlesim turtlesim_nodeNow, a little window should open on your screen and you should see a little turtle in the middle of a colored canvas.
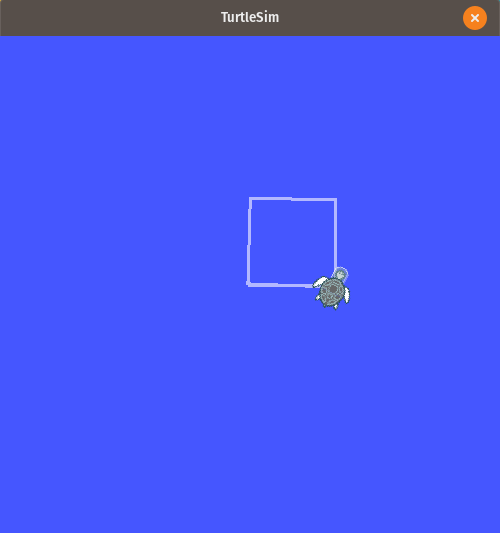
Next, you can interact with the turtle by starting another node by opening a new terminal and typing:
rosrun turtlesim draw_squareThe turtle will start moving in a square shape and it will draw a line on the canvas where it is moving:
At this point, you have two ROS programs running that interact with each other. As mentioned earlier, each ROS program is running as a node. These nodes can be visualized with a program called RQT. You will learn more about this software later, but here is the graph that this software will generate for your current setup:
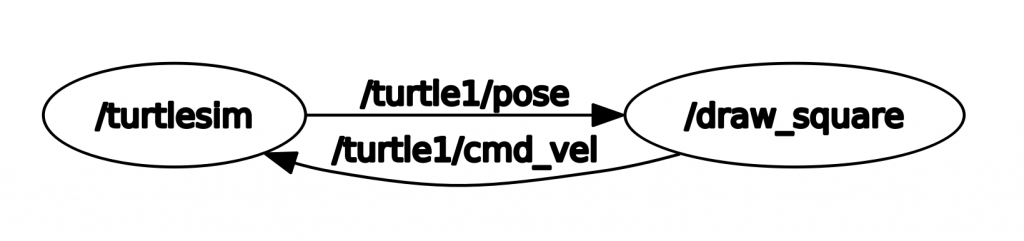
You have two nodes running and they communicate by using Topics. In the next article, you will learn how to create your own package and how you can simplify the process of starting multiple ROS programs at the same time.
Overview of ROS
Did you hear about this ominous thing called ROS but you don’t know what it really is? Or have you an idea what the Robot Operating System is, but you want to know how it works on a higher level? Have a look at the Overview of ROS article!
Overview of ROS
After you installed ROS, you will learn how to actually use ROS. Therefore, you will get an overview of what ROS does for you and how it works.
The Robot Operating System (ROS) is a meta-operating system that is installed on top of your actual operating system. In this case, you installed Ubuntu as your operating system.
To simplify things, you can see ROS as a tool-box including libraries and programs to develop and run robots. Some of the libraries are the OpenCV library for computer vision tasks and the tf library for frame transformations. Some of the tools that are included are Gazebo for robot simulations and RVIZ for visualization of your robot. In addition to that, there are software packages that have been created for specific tasks such as robot navigation or motion planning which you can simply install as they are openly available. For more information about ROS, you can have a look at the ROS Wiki.
ROS is released in different versions that go along with the current Ubuntu versions. The version discussed on this website is ROS Melodic which has been released for Ubuntu 18.04.
ROS Structure
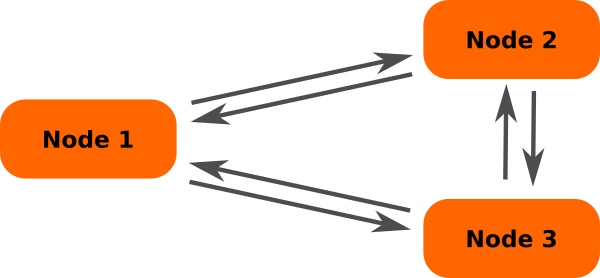
Programs within ROS are not simply started like other programs. Each ROS program is called a ROS node. Each node is usually built for one specific task such as navigation, reading sensor data or managing data and tasks. The nodes can communicate with each other to provide data to another node. The nodes can run with different frequency rates and they can even be executed asynchronously, which means one node can wait for the output of another node depending on the application. Having several nodes has the advantage that a failure that may crash a single node will not affect other nodes.
As an example, imagine the robotic arm will have an error and causes its node to crash, the navigation and the vision nodes will still be running. Furthermore, ROS can then restart the single node that crashed and send a warning to an operator and write the crash into a log file.
The implementation of having nodes run in parallel is also a very easy way to implement multi-threading which means the processor can run many tasks at the same time instead of one task after another.
Communication between Nodes
When several nodes want to exchange data, they need to communicate with each other. ROS has three main methods of implementing communication between nodes: Topics, Services and Actions.
Topics
Topics are the most important type of communication in a ROS system. They provide a constant flow of data from one node to another. This can be compared with broadcast radio where there is a constant signal with audio information. The radio doesn’t wait for the radio station to send a signal and the station doesn’t care how many radios are listening.
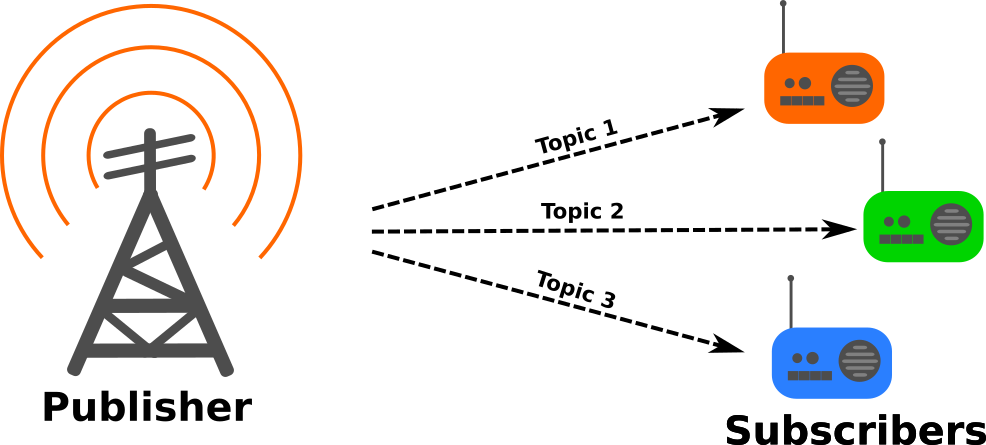
In ROS, such a broadcaster is called a Publisher node which is publishing to a Topic. A node that is listening to that Topic is called a Subscriber which subscribes to this Topic. The Topic is the actual data stream containing a specific type of information such as camera data or movement data.
In other words, Topics send data from a Publisher to a Subscriber in form of a data stream. This is important for applications that require constant data input. These data streams create a lot of data traffic within the ROS network which needs to be kept in mind when creating another Topic.
The most prominent Topic used in a robot is the /cmd_vel Topic that contains the velocity commands for the robot. These commands tell the robot where to go and at what speed.
For more information about Topics, you can have a look at the ROS wiki page.
Services
Services are less frequent than Topics but they can be very handy to reduce the overall data flow. Services do not provide a data stream, but instead, they work with asynchronous data requests similar to a web server hosting a website. When a person is calling a website, the computer sends a request to the server for receiving the web site content. After the web server has executed its task, it will send the requested data to the user and the communication is finished.
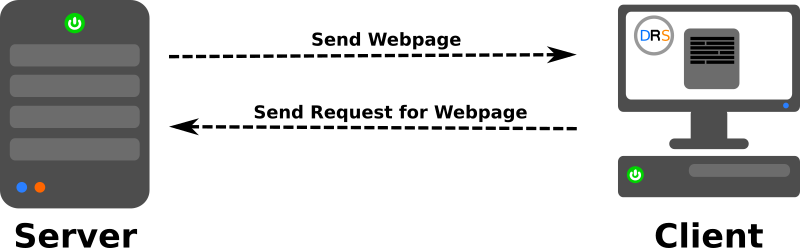
A Service is also implemented by setting up a Service Server which will wait for a call while the Service Client will call this Server. The Server will then perform its task once and send a signal back to the Client to tell if it finished successfully or failed. That’s it, there is no more communication between both sites. Also, the Client will wait for the response from the Server and will only resume its task when it received a response.
An example of when to use a Service would be a drone that is taking of, or even landing. When taking off, the drone simply needs a single signal to start the takeoff process and it doesn’t require constant input from the controller. When the drone is up in the air, it will send a quick response to the controller to say that it has succeeded.
For more information about Services, you can have a look at the ROS wiki page.
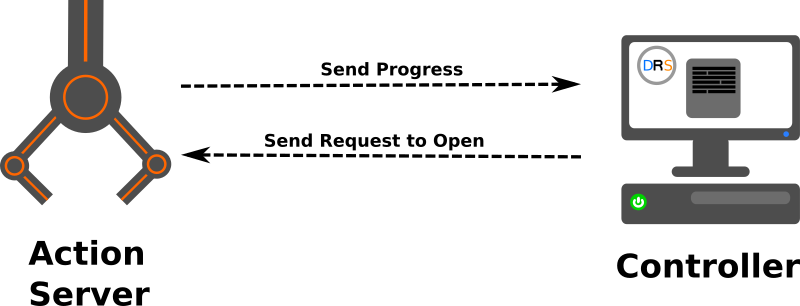
Actions
Actions can be seen as a middle ground between a Topic and a Service. Just like a Service, there is an Action Server and a Client. Now the difference to a normal Service is that a Service Client is waiting for a response from the Server while an Action Client will continue with another task. On the Action Server, the task will be executed and the Action Server will send regular updates to the Client. These updates are less frequent than a Topic but they occur at a user-determined frequency.
In other words, with Actions, the Client doesn’t need to wait, but similar to a Service it will get a response when the Server has finished its task.
A good example of using an Action would be the action of a mechanical gripper. While it is closing, it will provide you with information on whether it is closed or not. Also, Actions are ideal for tasks that do not need a constant data stream but yet take more time which makes it impossible to simply wait for the result. If your robot shall drive and perform another task, you cannot allow the robot to wait for the feedback of a Service, therefore, an action would be ideal in this case as the robot is still capable of observing its environment while waiting for the result of the Action.
For more information about Actions, you can have a look at the ROS wiki page.
Combination of Topics, Services and Actions
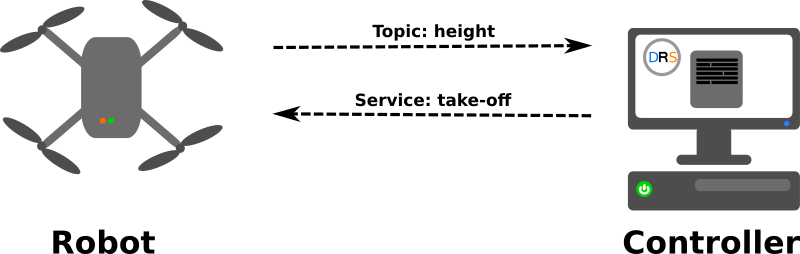
Usually, you take the tools that are best suited for the job. In the case of ROS, you have to choose whether to use a Topic, a Service or an Action. In a complex system, there are usually many different ways of communication used at the same time.
For example, then you want to control an autonomous drone, you will simply use a Service for a takeoff command while you will have a Topic that gives you information on the position and height of the drone. Once you worked with some ROS packages, you will get a feeling of when to use which type of communication.
Software Management
The entire ROS system is managed by something called the roscore which observes all the active nodes and manage all the communication done through Topics, Services and Actions. The roscore is what creates the magic behind ROS as it manages all the tasks in the background.
The roscore is watching each node and its state. If a node crashed, it will keep track of this and depending on the configuration, it will run that node again to make sure the underlying task will be executed. As the roscore is the root of all the ROS behaviour, this node needs to be the first node to be running.
Besides from watching the nodes, the roscore also manages the data traffic by looking which Topics, Services and Actions are currently available, which of these are currently called and which node is calling which message type at what time.
Programs in ROS
ROS officially supports two different programming languages: C++ and Python. C++ is more resource-efficient and the code runs faster as it is a rather low-level programming language and because it is compiled (this means, the source code is converted into machine code) before the execution. Python on the other hand is slower as it is a scripting language but this makes it faster to test the code as no compilation is necessary. If you want to learn more about how to program with Python, have a look at this programming guide!
Next to C++ and Python, many more programming languages are not officially supported by ROS, but there are libraries to bring the ROS functionality to the corresponding language such as Go or Rust.
Packages in ROS
ROS is built to be modular. This means that the software is split into several packages that can interact with each other. usually, there are packages for navigation, sensing the environment, mapping the environment, computer vision and general control of the robot. Having several packages makes it easy to share the functionality of one package across several different robots. At the same time, when you create a new package, you only need to program the parts that are not already implemented in another package. To increase reusability, it is important to keep your code robot-agnostic which means the code should work for all situations and not only for this very specific robot. If the package works despite it doesn’t know which robot it is running on, it is more modular and can be shared with colleagues across the world or simply within the robotics group that you are working with.
The Robot Operating System – ROS
The Robot Operating System or ROS for short is a useful framework to develop robots. The following pages will tell you more about how to install it, set up your workspace and start your own projects.
ROS Melodic
ROS2 Foxy
Installing ROS Melodic
The Robot Operating System, or for short ROS, is a so called meta-operating system for robot development. Basically it is a framework including libraries, tools, modules and complete solutions to make a robot do what you want.
The easiest and most reliable way to install ROS on your machine is to install it on an Ubuntu based system. Make sure you have Ubuntu installed on your system before you proceed as this guide will be based on Ubuntu. The instructions provided in this guide are from the official ROS Melodic installation page.
Note:
The following sections will use some common commands for the bash shell. One of them is sudo which is the way to tell bash to run the given command with administrator rights. This will usually require you to type in your password. Another common command is apt which is calling the package manager. The package manager is responsible fr installing, updating and removing software from the official repositories on your system.
Installing ROS
First you need set up your computer to accept software from packages.ros.org:
sudo sh -c 'echo "deb http://packages.ros.org/ros/ubuntu $(lsb_release -sc) main" > /etc/apt/sources.list.d/ros-latest.list'Next you need to add the key to your system:
curl -s https://raw.githubusercontent.com/ros/rosdistro/master/ros.asc | sudo apt-key add -Next you need to update the system:
sudo apt updateNow, you can install the software. There are different versions. If you want to use it for developing software on your computer, you will probably want the full package:
sudo apt install ros-melodic-desktop-fullYou might get ask to confirm the installation with a [Y/n] prompt. Press enter to confirm the default action. This might take a while as the software is quite large.
Setting up the Environment
The first thing you want to do is to configure the .bashrc file. This file is a hidden (as its name starts with a dot) configuration file for the bash shell (the software running in the Terminal). The .bashrc file is read by the shell every time you open a new tab or window.
echo "source /opt/ros/melodic/setup.bash" >> ~/.bashrc
source ~/.bashrc
This command will write the source /opt/ros/melodic/setup.bash to the .bashrc file. So every time you open a new terminal window or tab, it will call the setup script to enable the ROS functionality.
Setting up the Dependencies
Before setting up the dependencies, you first need to install some software that allows you to initialize the dependencies:
sudo apt install python-rosinstall python-rosinstall-generator python-wstool build-essentialThe next thing you need to do is to initialize the ROS dependencies:
sudo apt install python-rosdep
sudo rosdep init
rosdep update
Now, the ROS environment is ready so far, but you still want to make some changes on your setup to make the use more convenient.
Setting up the Workspace
Next, you should create your workspace. ROS is using a system called catkin which is a way to organize and structure the workspace. Therefore, the workspace is usually called catkin_ws. You can create it as follows:
mkdir -p ~/catkin_ws/src
cd ~/catkin_ws/
catkin_make
Now that your workspace has been created, you need to initialize it:
source ~/catkin_ws/devel/setup.bashAs this needs to be done for every new terminal window and tab, you can also write this into your .bashrc file:
echo "source ~/catkin_ws/devel/setup.bash" >> ~/.bashrcWhen using the visualization tool RVIZ, I noticed some buggy behavior. This can be solved with the following. Open the .bashrc file with a text editor and add the following line at the bottom:
LC_NUMERIC="en_US.UTF-8"This is it, you have installed ROS and set up your workspace. The software packages that you are writing need to be placed inside the /catkin_ws/src directory.