After you learned how to use a ROS2 package, you will learn how to create your own ROS2 package.
To start, first, make sure ROS2 Foxy is installed. If this is the case, you can activate the ROS2 Foxy installation with:
$ source /opt/ros/foxy/setup.bashNote: You need to repeat this command for each new terminal. If you write this command into your .bashrc file, you do not have to repeat it each time.
Create a Package
Your own ROS2 packages should all be placed inside your ROS2 workspace, which you probably named ros2_ws. ROS2 has its own command to create new packages. Open a terminal and type to enter your workspace’s source code directory:
$ cd ~/ros2_ws/src/You can create a new ROS package with the following command:
$ ros2 pkg create <package_name>Here, the <package_name> is the name of your package. Note that you can not easily change that name after you create it, as you will need to modify the CMakeLists.txt file and the package.xml file.
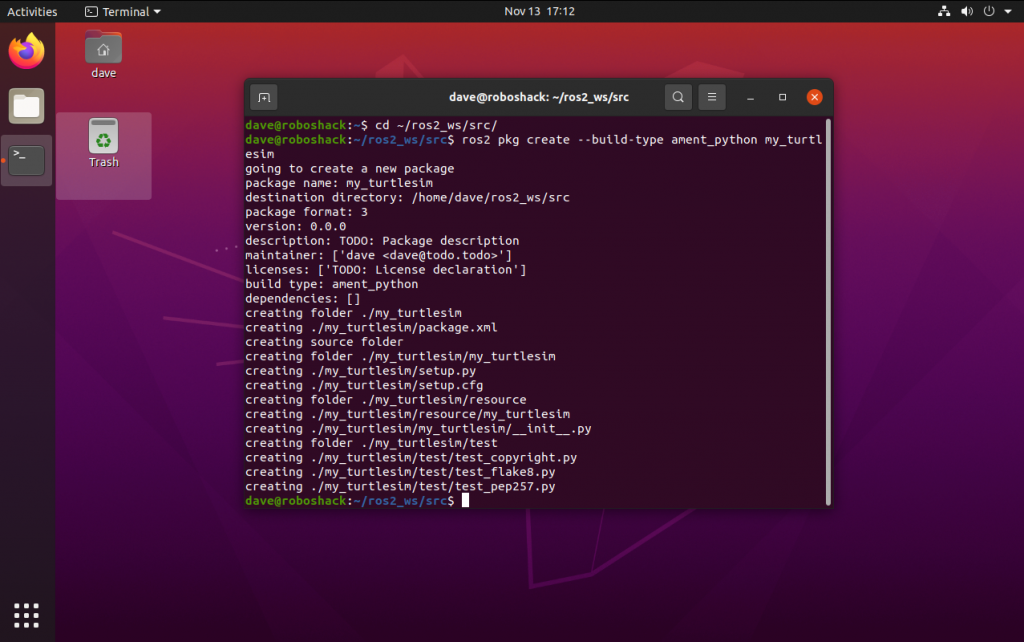
Next to the package name, you will also need to specify whether it will be a C++ package or a Python package. For this, you need to add --build-type ament_python to the command. Let’s create a Python package called my_turtlesim:
$ ros2 pkg create --build-type ament_python my_turtlesimIt is a convention to name ROS2 packages with lowercase names combined with an underscore. This notation is also called snake case.
The terminal will show some details of what files are being created inside the new package.
Enter the folder my_turtlesim. Here, you will find several files and directories. You can enter the package and show its content with the following commands:
$ cd ~/ros2_ws/src/my_turtlesim/
$ ls
The following picture shows you the output of the list command.
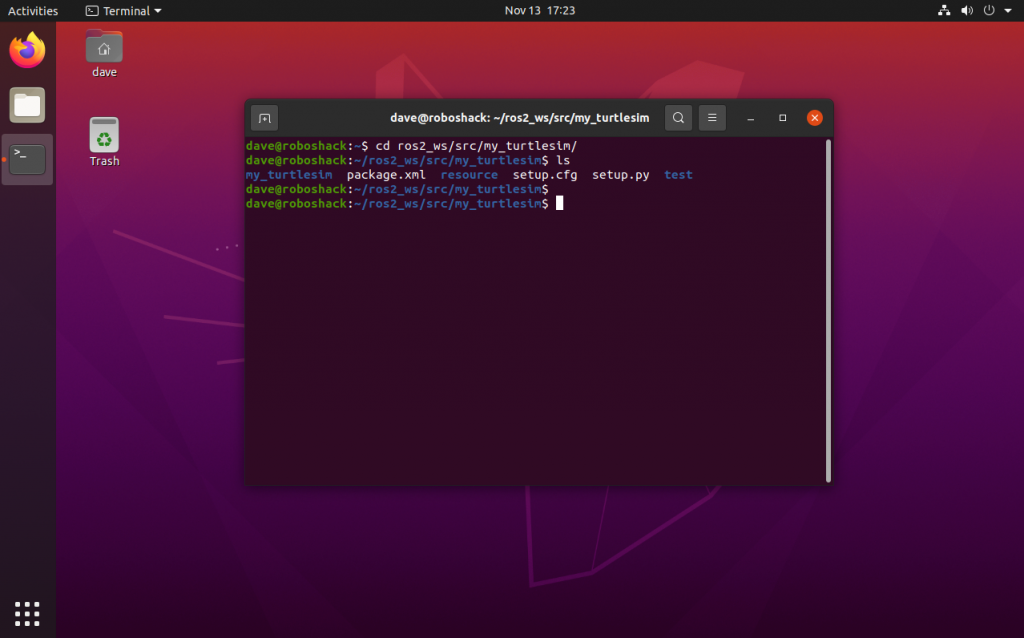
You can see that the my_turtlesim package has the following folders and files:
- my_turtlesim: contains source code for the ROS2 Python programs
- package.xml: contains package-specific elements such as dependencies and author information
- resource: for libraries files
- setup.cfg: contains instructions to build the ROS2 package in general
- setup.py: contains instructions to build the ROS2 package such as which programs to build and where the launch files are located
- test: contains test files to test the code
You can create additional folders such as a launch folder for launch files or a config folder for configuration files containing ROS2 parameters.
Create a ROS Python Program
Now, you can create your first ROS2 program with Python. Enter the my_turtlesim directory with your terminal:
$ cd my_turtlesim/You need to create a new file with the file extension .py in order to have a Python file. You can create a new file and open it with your terminal with the following command:
$ gedit my_first_program.pyYou will see that a new window will open on your screen with an empty text file. This is where you will write your first ROS2 program in Python.
Write the following code in your file and save the file. This code will simply create a ROS2 node that displays a message I n the terminal. It does nothing else than that. This node is an absolute minimum working example for a ROS2 Python node.
import rclpy
from rclpy.node import Node


class MyFirstProgram(Node):

    def __init__(self):
        super().__init__('my_first_program')
        self.get_logger().info('Hello, World')


def main(args=None):
    rclpy.init(args=args)

    my_first_program = MyFirstProgram()

    my_first_program.destroy_node()
    rclpy.shutdown()


if __name__ == '__main__':
    main()
To use the ROS2 tools inside a Python script, you need to import the ROS Client Library for Python with import rclpy.
Every ROS2 program is running as one or multiple ROS2 nodes. To create these nodes, you need to import the Node class from the rclpy module and create a class that inherits from the Node class.
class MyFirstProgram(Node):

    def __init__(self):
        super().__init__('my_first_program')
        self.get_logger().info('Hello, World')
Inside the class definition, you need to specify the name of the node. In this case, it is defined as my_first_program. The node name should give clear information on what the node is doing.
The main function will initiate the ROS2 module and read any ROS2 arguments. Then, it creates an instance of our custom Node class. Then, The code makes sure the node is closed properly after finishing its job and the program exits.
def main(args=None):
    rclpy.init(args=args)

    my_first_program = MyFirstProgram()

    my_first_program.destroy_node()
    rclpy.shutdown()


if __name__ == '__main__':
    main()
Before you can run your program, you need to make the Python file executable, this means giving this file permissions from your system to be executed as a program. Usually, files only have permission to be read as a file or to be modified. This is also known as read-write permission. To add the permission to execute the file, make sure you are in the my_turtlesim directory and type the following command in your terminal and press ENTER:
$ chmod +x my_first_program.pyMaking Python files executable is required for each Python file you create but you only need to do this process once for each Python file.
Next, you need to tel the ROS2 build system, called colcon, which Python program to build. For this, go to the package root folder and open the file setup.py. Add the following piece of code into the entry_points={} part:
entry_points={
        'console_scripts': [
            'my_first_node = my_turtlesim.my_first_program:main',
        ],
Open the file with the following commands:
$ cd ~/ros2_ws/src/my_turtlesim/
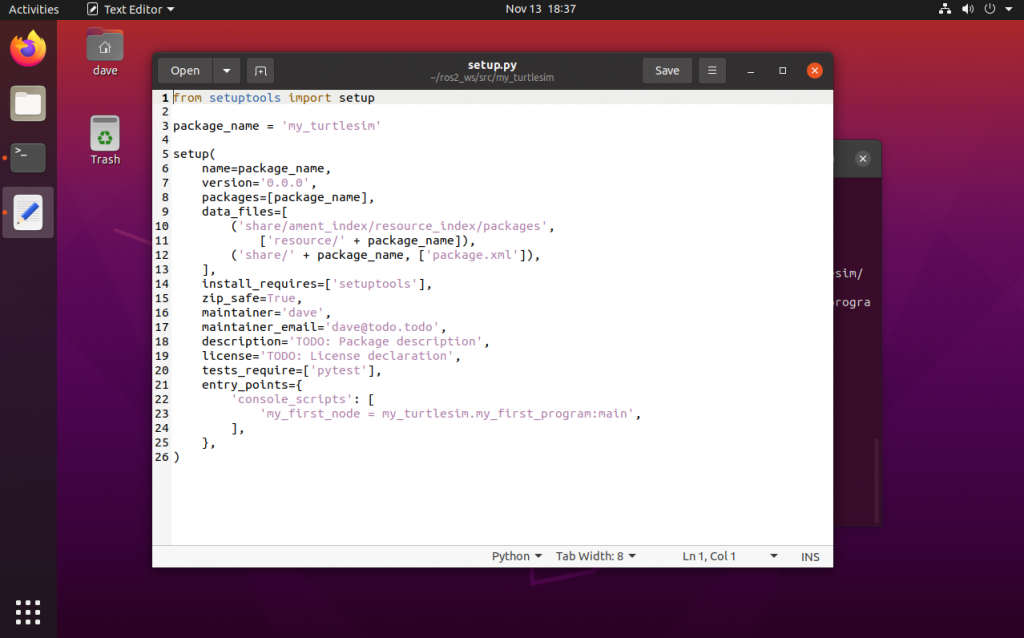
$ gedit setup.pyThe entire file should look as follows:
from setuptools import setup

package_name = 'my_turtlesim'

setup(
    name=package_name,
    version='0.0.0',
    packages=[package_name],
    data_files=[
        ('share/ament_index/resource_index/packages',
            ['resource/' + package_name]),
        ('share/' + package_name, ['package.xml']),
    ],
    install_requires=['setuptools'],
    zip_safe=True,
    maintainer='dave',
    maintainer_email='dave@todo.todo',
    description='TODO: Package description',
    license='TODO: License declaration',
    tests_require=['pytest'],
    entry_points={
        'console_scripts': [
            'my_first_node = my_turtlesim.my_first_program:main',
        ],
    },
)
Save the file and close it.
When you build the package later, this line will make sure that the Python script will be seen as a valid ROS2 node with the name my_first_node which can be found inside the my_turtlesim package and the source code is saved in the file my_first_program.py.
Note: the node name and the Python file name are not the same in this example. Many ROS2 developers actually use the same name for both to keep their packages a little bit more organised. Here, the names are different to make it clear which name refers to which element.
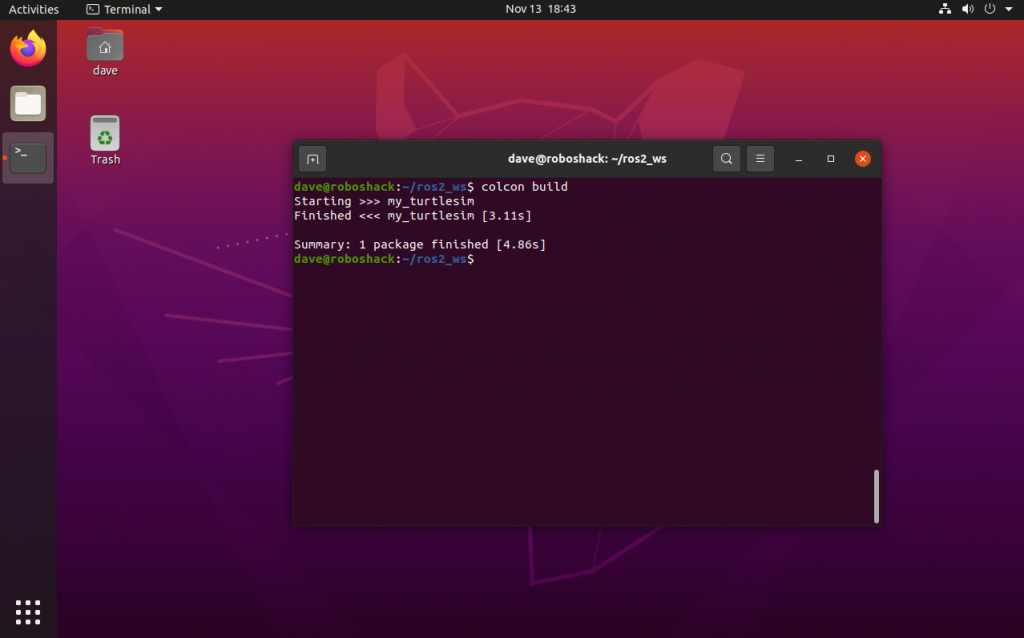
After that, go to the main directory of the ros2_ws and build your package:
$ cd ~/ros2_ws/
$ colcon build
The terminal will show you some details about the build process such as which package is being built and how long it takes.
Next, you need to source this workspace so that ROS2 will take into account all the packages in this workspace:
$ source install/local_setup.bashNow, everything is ready to run your new program. For this, use the following command:
$ ros2 run my_turtlesim my_first_nodeThe terminal should output the following text:
[INFO] [1663744547.799484529] [my_first_program]: Hello, World!This is it, you just grated your first Python program in ROS2! Congratulations! Of course, this program is not doing anything useful yet. But this is the absolute minimum you need to run a proper ROS2 Python program.
Tip: you don’t need to type the entire command by yourself. If you start typing a word, you can double-tap the TAB key on your keyboard to auto-complete the commands in your terminal.
Note: if your computer doesn’t show your ROS2 package, first make sure you actually have spelt the names correctly and that the package actually exists. Also, if the package is new, ROS2 might not know about it yet. Therefore, type the following to list all the packages on your system, after that, ROS2 should be able to auto-complete the name of your package as well:
$ ros2 pkg listThe above command will list all the installed ROS2 packages on your computer. As ROS2 is going through the entire system, it will probably find your package and add it to its known packages.
Next, you will learn how to create a node that can actually interact with other ROS2 nodes by using ROS2 topics.